Showing posts with label sketchbook. Show all posts

Thursday, November 25, 2010

Plants of the Delaware and River words brainstorm

On Friday, I hung up the collaborative Delaware River map for the kids to copy into their sketchbooks while a few of the students finished up their leaf embroideries. Cindy helped the embroiderers while I got set up for our lesson. We brought in the laptop and projector in order to take a look at a satellite view of our watershed. The kids noticed that the satellite view was like a bird's-eye view. We located the Delaware and compared it to the fiber version to make sure we could find all our river parts (source, meander, tributary, mouth/delta).
looking at the satellite view-
the kids were excited to see the zoom in and out to see the world
and then their school close-up
 We pointed out the low land in Pennsylvania, Delaware, and New Jersey where there are many farms and a lot of "green" on the satellite view. We brainstormed with the kids some of the plants and crops that grow in our area, based on the farms they've seen or visited, or fruits and vegetables they eat at home. They came up with strawberries, corn, tomatoes, blueberries, pumpkins, watermelons, and carrots. We even noted that Chester County, PA is famous for mushrooms! We saw lots of green in NJ, and I pointed out the gigantic forest of pine trees called the Pine Barrens. We looked at the mountains and talked about why there aren't many farms up in the mountains, because of colder temperatures and rough, rocky terrain, but there are lots of forests.
Emily cuts out her embroidered leaf
 Next we transitioned to cutting our leaves out to place on the collaborative Delaware River map. I asked the students to decide where they wanted to put their leaf, mark it on their drawing, and have a reason why they wanted it there. I showed the students my sample cut-out leaf, and Cindy noted it was an organic shape not a geometric shape.
Liz decides where her leaf should go on her map
 and Justin shares his leaf ready to pin up
 Cindy supervised the cutting-out while I stayed near the river model ready to pin the kids' leaves as they were finished.As students completed cutting out their leaf, they came up to me with their leaf and sketchbook to tell me where they wanted their leaf to go and why. Some chose spots in New Jersey because that's where they go in the summer. Some wanted their leaf up in the mountains with the forests. A few wanted to be in the suburbs because there are lots of trees where they live.
the giant river model before the leaves got pinned
When all the leaves went up, we moved on to brainstorming for our next project- a river poem to add to our map. Cindy helped keep us on track for what kind of words and language they'll need for writing their cinquain next week by prompting possibilities as I wrote the students' words up onto the board into a giant word splash. The children created their own version in their sketchbooks, taking notes, which finally, we had them go back and color/circle words they think they'll want to use.

Wednesday, November 3, 2010

River Model Prep

To prepare the students for our river model project and incorporate some reading practice, Cindy found a great 2-page story about 3 kids making a relief map model out of dough. A lot of art vocabulary was used, like modeling and representation, and Cindy defined dough in a very tactile way that should have them sparked for working with the model magic on Friday! Cindy and the guided reading specialist pulled aside particular kids for guided reading groups to help them through the story while I kept an eye on class progress, answered any vocab questions, and redirected some of them to where to find the answers for the comprehension questions at the end. It was interesting to see how so many of them gloss over or write simple/easy answers, but when prodded or questioned to think about the "why" then they are able to provide a more in-depth answer. There's a lot of copying going on, even artistically, and I wonder right now if it's just a strategy that helps the below-level students keep up and how much to allow it.
While we waited for students to finish the reading we passed out sketchbooks and gave kids time to color some of the sketches they had done on our trips. It was nice to revisit the experience that way. Some of the kids debated about what they saw when/where.
With everyone ready, I asked the kids what the reading was about (making a model out of clay). I asked them if they remembered seeing any other models when we were on our trips (the swing bridge at the canals, the Delaware river map at Penn's Landing, and the pollution watershed model at Riverbend). I told them we would be making our own river models and so we needed to brainstorm what important things should be on the model. With "Parts of a River" written on the board the kids helped fill in the spidergram (water, land, tributaries, mountains, source, mouth, animals, plants, roads, houses, bridges, boats, buildings, urban, suburban, rural).
When we got to the last 3 words about community types a student hopped up and brought me a chart they had made with Cindy showing urban, suburban, and rural in concentric rings with pictograms of what one might see in each spot and how crowded or spread out they'd be (I love seeing how much drawing Cindy uses in her lessons- is this a new thing? Even in the math lesson I saw at the end she asked the kids which way it was easiest to solve the problem-- and stressed drawing a picture). This gave us a quick review and opportunity to talk about communities we've seen and experienced, and compare the kids' more suburban life with my city life.
 With that I told the students that we'd be making our own river models that share all the physical river features (and we circled source, mouth, land, river, tributary, and meander) but that they'd be able to choose whether their model showed a rural, suburban or urban area. I passed out the mdf boards we'll be using as a base for the children to trace in their sketchbooks and make a plan. I asked them what we call that plan an artist makes before they start a project (Sketch!).
The kids had plenty of time to draw a design for their river model, which I hope will make the creation of it on Friday an easier process. It allowed for some problem-solving and checking of student understanding.
I think we're ready to make some models!

Thursday, October 14, 2010

Field trip! Urban Delaware River

This morning we had our second field trip. We visited the Coast Guard Base on Columbus Blvd to experience the fire department's fireboats. Tide was almost out, so we had to walk down a steep ramp to the floating dock. Two ships were tied up at the dock- a brand new pumping boat and a 60-year old workhorse which we were told helps the Coast Guard chop up ice floes in Winter. We boarded the pump boat and the groups went up one by one into the wheelhouse to hear the pilot speak. I kept an eye on deck, so Cindy will have to elaborate. While the groups waited their turn I tried to engage the kids in thinking about what they saw along the river and how it was different from our previous ship. The children were very excited to see ducks, seagulls, and a very small school of fish in the water.
After the talk the pilot asked the engineer to start up the pumps. The boat has three spray nozzles: one on the bow of the boat which swivels left and right, one at the stern which swiveled up and down and left and right, and one very large one on top of the wheelhouse that shot the water nearly straight up. The students had great fun taking turns controlling the direction of the spraying water, pretending to put out fires. It was even more impressive when all three nozzles were going at full force!
After that great adventure, the pilot took us on a tour of the rest of the pier. We looked at a buoy boat which checks on and places red and green buoys in the river to direct the boat traffic. We also saw various police boats. Some were very small and fast, others had removable sides for aiding in rescue and to allow divers to ease into water. We saw a Pilot boat which takes a pilot out to a ship to steer a foreign ship up the river. On the opposite bank of the river we viewed huge container crane elevators that lift container boxes onto ships. We saw a stack of orange shipping containers, and even saw one drive by on the bed of a truck. This helped explain how goods are brought from other countries, like toys and food, in big containers and then set onto trains and trucks to carry throughout the country. The Pilot also explained that it's the Coast Guard's job to protect us and to inspect the goods and people that come into our port cities on boats.

Saying goodbye to our pilot, the kids hopped back on the bus to make a short trip to the Great Plaza at Penn's Landing. We ate lunch at the riverside- a challenge with all the hungry seagulls about! There's a very detailed engrave scale model of the Delaware River along the promenade, so after lunch we lined the kids up for a follow-the-leader down the river. Before we started I asked if they remembered in which state was the river's source (New York!), and then as we go down the river what state is on our right (PA!), and on our left (NJ!) and where is the mouth of the river (Atlantic Ocean!). Walking down the river we noted all the tributaries and major cities along the path. We had enough free time to allow for some sketching. I helped one boy do a grid enlargement of the river engraving he wanted to draw so much. I drew out a grid on his page after asking him to count how many tiles there were. Then we looked at each tile and found the lines to match up with the squares on the page. Other students drew the Ben Franklin bridge, and others noted the many birds about.
We took one last stroll down to a Steamboat docked at the landing, then returned to the bus and back to school. There's so much new information to think about! I'm eager to get back into the classroom so we can process these ideas with our art projects and writing. One more Field trip to go on Friday!

Saturday, October 9, 2010

Field trip sketching video

Field Trip!!

This morning we all got onto a big yellow school bus with our students and some parent chaperons for our trip up to see a rural section of the Delaware River. We had the kids bring along their sketchbooks and reminded them to be aware of people, houses, plants, animals, uses, and problems of the river throughout the day. I told them they might want to sketch something they noticed from those categories as we might want to use that information later on in our project.
I was surprised that we took mainly back roads and no major highways on the ride up to Upper Black Eddy, Bucks County. This route offered numerous opportunities for the children to observe rural community and land features, and they were eager to sketch on the way up. "HORSES!!!!!" was a common cry. Students noted corn-stubble fields, barns and fences, mountains, ponds, geese, deer, small creeks which grew into larger streams as we neared the river, the Delaware Canal, and of course the Delaware River! Mrs. O'Donnell passed out a tourist map of the Bucks County area to the kids mid-trip, and students searched for the boat we would ride on. As they examined the maps I asked them how many bridges they could find, where the canal was and how it looked different from the river (it was thin and straight not wide and curvy), where the compass rose was on the map, etc. Some students were inspired to sketch the map or the boat as they imagined it would be afterwards. This was the first time I'd ever been on a field trip as a student or a chaperon where I felt the journey itself was part of the educational experience!
When we arrived in Upper Black Eddy, we were greeted by Captain Dee of the Bucks County Riverboat Company. We boarded "The River Otter", a flat bottom pontoon boat which we were told could navigate the river even in 2 foot shallows! Before we launched, Captain Dee asked if we had noticed all the mud on the ramp and dock, and explained that just a week ago the river level was a good 6 feet higher due to massive rain. He also showed us what the highest flood level had been in recent years and told us that people who live near the river often have their houses flooded. Some of the houses must even be rebuilt on stilts to avoid the floods.
We motored upriver under a truss bridge that had been built in 1843 and saw lots of logs piled up against its stone supports- further evidence of the recent heavy flooding. Along the way Captain Dee helped the kids brainstorm some of the river animal life. In particular he explained the contrasting spawning habits of the American Shad and the American Eel. The former lives in the ocean and swims up the river to spawn, and the latter lives in the river but migrates all the way to Bermuda and the Sargasso sea to spawn. The kids spotted Turkey vultures circling the New Jersey bluffs and a Great blue Heron at the water's edge. It surprised us all when the Heron took flight and swooped past the boat! Dead fish and turtles were some other notable wildlife. I was impressed by the breadth of Captain Dee's repertoire of information. I wondered if Mrs. O'Donnell had asked him to cover certain topics, as it all seemed wonderfully relevant to our goals.
After our boat ride we hopped back on the bus, crossed to NJ over the truss bridge we'd ridden under, and headed downriver to Bull's Island Recreation area. We stopped for a quick picnic lunch, then took a walk over the pedestrian-only suspension bridge which connects NJ and PA at Bull's Island. The kids enjoyed standing in "2 places at once" between the states, and experiencing the vibrations of the suspension bridge.

We then headed back to the Visitor center lawn for a presentation by a state park historian (I missed her name!). The historian shared maps and pictures of the Delaware and Raritan Canal, and explained that it was built in 1830 by workers with shovels and wheelbarrows to connect trade between Philadelphia and New York City. She told us how the boats were towed up the canal by mules on the towpath. She revealed a working model of a canal lock and explained how the parts worked to lift and lower canal boats like an elevator for going up hills. She also showed us a model of a swing bridge with an A-frame which would allow boats to pass when the bridgekeeper heard their horns blow. I'm not sure how much the kids retained from her talk... there were a lot of bathroom trips, worries about the numerous bugs (daddy long legs and stick bugs!), end-of-trip distraction and tiredness, and the kids were too spread out on the lawn for the historian to really actively engage.
On the bus ride home we encouraged more sketching. I pulled out my own sketchbook and started drawing kids, much to their delight. I was transported back to my school days when my classmates would ask me to draw them and I found my niche as the class "artist".
It was along and exciting trip. What better way for students to learn about rivers than to experience them first hand? I believe this will provide rich background for our further explorations. Back in the classroom I pulled aside pairs of students for quick video interviews about what we've learned so far.

I have to compile the video footage I've shot so far and add it to the post.

Saturday, October 2, 2010

Day 5: continents and world map screenprint


world map image used in screenpint
 My perception of Friday's lesson is not as universal as previous days as I was really just working with small groups of students at a time, so hopefully Cindy can fill in what I missed.

I started with a quick review to see what the kids remembered from our previous sessions. (Responded shapes/lines, Van Gogh, one kid remembered Jean-Francois Millet correctly pronounced even!) I said we've been working on a lot of reading and writing lessons, but that we're starting to work on some more social studies ideas now. I brought in my Philly daily map screenprint on fabric to show the kids. I asked them if they could figure out where it was and what the format reminded them of (number grid!). After a few more hints they figured out that my repetition of the map represented a calendar. I explained that screenprinting is a type of printmaking for making copies of something. I compared printing to the computer printer or photocopier, but that a long time ago before machines, artists and mapmakers would use printmaking for creating lots of copies of maps.
On the board I listed several screenprinting terms: screenprint, squeegee, ink. I showed them the screen and carried it above their heads so they could see the light coming through the screen. I said the empty spots where you see light is where the ink goes through and the red stuff (screenfiller) blocks the ink from touching the paper or fabric. I also passed around a squeegee and said it had a handle and a blade. Then I demonstrated (without ink) how to pull the squeegee across the screen to make the ink go through. Then I explained the printing process we'd go through as a group: come back, put on a smock, pick a fabric, place it on the board following the taped outline, 2 people to help hold down the board and screen while one person prints, then to wash hands while I hung their print on the line to dry. I insisted that it was very important that we cooperate, move quickly to get ready and exchange smocks and print because if the ink dried out in the screen it would block up the screen like the red stuff and ruin our image.
I asked them what the image on my screen looked like (response- a map!). I asked them if they knew their continents already (North America! Asia!....) Cindy uncovered a map of the world on the bulletin board and I tried pointing to each continent to see if they could remember any more (Arizona! London!). Cindy said she was going to teach them a song later about the continents, but I'd already planned to share one and asked if she minded if I sang them my version.She said okay and I asked the kids to sing/repeat after me as I pointed to each continent. To the tune of Frere Jacques, "Europe, Asia (repeat), Af-ri-ca (repeat), North and South America (repeat), Antarctica, Australia (repeat)".  We sang that twice, and then I pulled out a paper copy of the map we'd be printing (see top of post), and said I'd like them to color in each continent a different color following the colors on the map on the board while the individual groups were back with me printing. Cindy stepped in to run the map diagram portion of the lesson and I went back to set up/start printing.

Bailey reveals her print
 Each group came through very quickly and orderly. They helped each other put on smocks and print. I let the kids pull at least one stroke towards them across the screen, and then to ensure a complete print, I pulled a second stroke back. We lifted the screen and the kids pulled out their complete print. I wrote their name on the bottom, hung it up, and moved on to the next kid to print. They all followed directions beautifully! We had no big mess!!! I was most afraid of this, since we were in a regular classroom not the art room, and I didn't want any kids to mess up their clothes. One student ,who I believe is an ELL student, lit up when he printed and asked "I do it 100 times?!!" He really enjoyed printing, and I hope through the rest of our art activities he'll be a more engaged and confident learner. Another student, who seems very resistant to working in color for some reason, found printing very exciting and as he watched everyone in his group print kept saying "It's MAGIC!!!"

As I said before, I was not totally aware of what the rest of the class was doing as I worked with each group. At one point there was some boat drawing on the board. Generally, the students seemed focused on work in their sketchbooks. So Cindy will have to fill in here.

At the end of class after I had cleaned up all the screenprinting paraphernalia, I reviewed the vocabulary we had learned about screenprinting with the kids and we sang the continents song one more time. I explained that next time we'd be learning about rivers of the world and stitching on our fabric maps.

There's no way I could have done screenprinting in this way without another teacher in the classroom. Today I really felt like an ARTIST in residence more than a TEACHING Artist in residence because I was really working individually with the kids to go through the printing process. In a way I was a little carried away, because I probably could have changed my orientation in the room so to be more aware of the entire classroom. It's too bad we couldn't have gotten through our rivers of the world series of lessons prior to the trips that are coming up. I hope the kids don't get confused. On Wednesday we need to go through the science and social studies pretests before our North American River lesson starts. We should probably have some animals, plants, people, etc worksheets ready, as I'd like the students to add a detail like that to the map in marker before we start stitching. 

Tuesday, September 28, 2010

What the Gleaners did next

I went back and photographed some of the kids drawings of what they thought the Gleaners did next:

Justin's 2-page spread with fold-out perspective

Angelica copied the pose and details of her figure straight from the painting!


Erin paid close attention to the figure in the painting too.

Danielle shows her lady going home to cook bread from her wheat.

Monday, September 27, 2010

3rd lesson: Gleaner foursquare and writing

Today was a catchup day to make sure we stayed on schedule before our trips. I came in early to read some of the students' baseline writing examples as well as score the art and fiber art pretests. As expected, the pretest scores were very low.

To begin our lesson Cindy reminded the students about the mini lessons on writing they'd been learning in the past week, including writing in paragraph form, using sensory words, using signal words (shown above), and beginning and ending with and interesting question or idea to catch the reader. I was unfamiliar with the term "signal words" so I asked the students to explain what it meant. Afterwards I had one group help distribute our sketchbooks.

While I set up our projector and image, I asked the kids if they remembered the title of our painting (The Gleaners), the name of the artist (Jean Francois Millet- we pronounced it again as a group), if they remembered how many kids he had (9), and if he lived in the city or the country (country). They remembered quite a lot of information! Once our image was up and ready, I asked the kids if they could tell me what they saw in the picture (many called out shapes and colors they could see). I revised to ask what THINGS they could see, because the shapes help describe objects and people in the pictures (then they responded trees, houses, a man on a horse, grass, women). When a student said "Grass", I said, well it's not grass, it's WHEAT. "Does anyone knows what we use wheat for?" (cereal, bread, cream of wheat, crackers). I explained that the wheat in our crackers grows in a field like in the picture, and that nowadays we have machines that cut down the grain, and trucks to carry it to factories to be processed into flour and baked goods. I asked if they remembered when the painting was made and how old it was (1857- about 150 years ago). I said that things were different back then and people had to do all the work.
I switched to a slide that only showed the background. "Is this far away or close to us? How do you know" (responded, far away because the things are small). I then explained the story of the background: the man on the horse is the boss, and all the people back there are working to harvest the wheat and stack it up to take to the barn. Then I switched to a cropped foreground view of the Gleaners. "Are the ladies close to us or far away and how can you tell?" (response- close to us because they're bigger). "Why do you think the ladies are far away from the other people?" (responses- they have a different job, they're slower, etc.) I explained that the ladies do not work for the man and they've gone into the field after the workers have already harvested the wheat.
I asked everybody to stand up, select one of the characters and try to take the pose of one of the women to feel their bodies. "What are they doing?" (response, picking up the grass and wheat). "Let's pretend we're picking up the wheat, bend over, pick some up and put it in your basket, bend over, pick up some more, etc". "How does it feel?" (my back hurts...) "Can you imagine doing this all day long in the hot sun, and your poor and hungry?" "Now how do you think the ladies feel?" I explained that the Gleaners are people who pick up and use what was left behind by other people, and these women are working in the field to get the leftover wheat so they have food to eat.
Having looked at the art, experienced the women's pose, and learning the story, it was time to write about it.
I passed out the new foursquare organizer and asked the students to glue it into their sketchbooks. I explained we're going to write a descriptive paragraph about one of the women in the picture. I said they should imagine they need to explain this picture to someone who has never seen it before and  use as many details and sensory words as possible to give the reader a clear image in their head. I reviewed each square and asked the students to respond by completing the sentence in each. The squares were :
-Describe what the woman looks like and what she's wearing, -Describe what the woman is doing, -Describe how the women feel, and -describe how you feel when you see this picture or what it reminds you of. Students moved at their own pace filling out their foursquares. Cindy and I moved around the room helping students stay on track, offering tips, and checking when students were prepared to start their finished writing.
When students were complete we asked them to draw a picture of what they thought their woman did NEXT. I reminded them to use details they noticed in The Gleaners, and remember line, shape, color, and depth elements. Some of them are very inventive and detailed, and I hope to go back and document some of them.

Saturday, September 25, 2010

2nd Lesson

Marie does such a thorough job in objectively describing exactly what occurred during the lesson! Sequentially, there is not much more for me to add. The debriefing notes that I took during the lesson correspond exactly to her account. I will add "teacher" comments that Marie may or may not be aware of that she is doing as she teaches. Marie has a natural "teacher" ability to intuitively assess student knowledge, which she may not be aware of!

Marie began the lesson again by tapping the students prior knowledge from the previous lesson, and reviewing it with the students. The initial response to "What 2 elements did we learn about the last time I was here?" was students answering random details about the elements. They hadn't organized the elements into 2 "main" elements in their minds so they answered random words which seemed to correctly answer her question to them such as thick lines, geometric, curvy lines, organic, straight lines.

These answers showed that they had absorbed the information, but hadn't organized it in a way that they would be able to access it. I suggested the graphic organizer of using umbrellas for the main idea and the drops under each for the details. I drew the umbrella for LINES and added the drops of straight, curvy, thick and so on; then another for SHAPES with the drops labeled organic and geometric. We have used this graphic organizer before to organize information in a logical way that the kids understand. Marie caught right on and used the same strategy for COLOR, adding 2 drops for primary and secondary, then putting smaller drops under each naming the specific colors. She continuously checked for understanding as and I rotated around the room looking at the student's sketchbooks. Again, the referencing to the literary concept that the students will be exposed to repeatedly, Main Idea and Details!

The lesson then moved on to The Gleaners. Marie's account of this is so thorough, I will just add some things from my notes that she didn't mention. Whenever opportunity arises, I am sure to connect the disciplines so the students are aware that the subjects they learn about are connected. We calculated the years, we referred to the geographic location of France, we connected to student experiences- he had 9 children, he liked to draw the area around where he lived, and so on. The painting we were viewing was "real"; we compared it to a Non-fiction piece of writing, because it was something he "really saw". Marie asked what kind of writing we would compare it to if it were something he had made up, and they quickly replied, "Fiction!"

She then compared artists to writers in that they first sketch (showed the sketch), then paint; whereas the writer first does a rough draft, then writes. He changed his mind, like writers do, etc. She asked if the Main Idea was the same in both, students understood and said yes. She then reviewed the elements of art learned that day, as it was close to dismissal. The final note I added was
ARTIST--Organizer-- SKETCH
WRITER--Organizer--4- square

Friday, September 24, 2010

Day 2: The Gleaner

We like this shared debriefing, so we'll continue. It's interesting to learn each of our viewpoints on what happened.

Today we started at 1:30, Friday afternoon, and the weather and the room were incredibly hot! When I entered the children were working at their centers for the first time- this is a group-independent activity. Today I saw one table working on reading and listening to themselves say poems, one group was doing First in Math on the computers, another was creating an autobiographical picture timeline, another was making a comic strip with dialogue, another was practicing reader's theatre, etc. It was great to see that Mrs O' Donnell uses artistic and creative activities to help kids learn all the time.
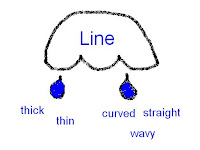
I started off by learning all the kids' names by table, and reviewing them as we'd run out of time in the first session.Then we began by reviewing what was learned the lesson before. "What elements of art did we learn on Wednesday" (kids responded geometric, organic, etc), Cindy showed me the Main Idea Umbrella and detail raindrops organizer the kids have been using. We drew 2 big umbrellas on the board for our 2 elements learned so far and I elicited what big idea geometric and organic falls under (SHAPES!). I then elicited LINE and supporting details thick, thin, curved, straight, wavy, etc. I explained we would learn one or 2 more elements that would help us talk about art.
At this point we got interrupted by a fire drill! Luckily I'd already been through one at Comly and was familiar with the route. While waiting outside I tried to remember their names now that they were all mixed up, not by table order. When we came back upstairs I had the kids do some breathing exercises to help them calm down and cool down from the jaunt outside and down and back up the stairs.
I asked for a helper table for passing out our pencils and sketchbooks, and Cindy helped set up our computer and projector. I played the video from artist's toolkit  for color, which shows primary and secondary colors twice. I did call and response for "Red, Yellow, Blue, Primary too, Primary Colors, Red, Yellow, Blue". I drew the main idea umbrella for Color with details Primary and the supporting details of individual color names on the board. I asked the students to find their red, yellow, and blue pencils to make their personal notes/diagrams in their sketchbooks, labeled primary colors. After checking around the room and sharing how some of the students had organized their information, I did the same for Secondary colors. I did call and response for "Orange, Purple, Green, Secondary, Secondary colors, Orange, Purple, Green", and had the students mark their sketchbooks with secondary colors.
I brought focus back to the screen to play the "Depth" clip on the artist's toolkit website. I pointed out how shapes are big in the foreground to show they are close to us, and shapes are small in the background to show they are far away from us. I played it again so the students could make note of where objects were placed in the picture and how their sizes made the space convincing. After some more questions from the students, we got ready for the next step.
I asked the students to get out a gluestick and turn to a fresh page. We'd been working with only one page visible, but I wanted them to open it up flat with two facing pages empty and with the book turned. I selected a student from my helper table and pulled out the photocopies of The Gleaner to pass out. Ms McCaffrey, our  resource support teacher reminded me I should tell them which orientation to paste the picture into their books. We passed out the copies and the students glued it in their sketchbooks. I pulled up a powerpoint for The Gleaner on the screen. I had the kids write down the title, artist's name, and date. I asked them to repeat the name after me "zhawn-franswa meelay" (Jean-Francois Millet). I compared the image info with the title and author of a book. While they wrote, I told them about Millet's life, born on a farm, had 9 kids, often painted life he saw in the countryside in France. Looking at the date we noted it was in 1857, about 150 years ago- Cindy reminded the kids about how they have been learning how to subtract years to figure out time between events. I asked them if they or I or Ms O'Donnell were alive in 1857 (Nooooo). I said we could put images into time lines and asked them if William Penn, whom they'd been studying, came before or after this picture, (before).
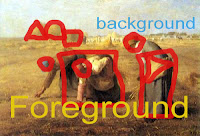
We looked at the color image of The Gleaners, and I asked the students what colors they saw (green, white, blue, orange, etc). I asked them what shapes they saw in the image (circles, rectangles, squares) and asked them to trace over their copy to find the shapes they saw. I explained all artworks use basic shapes for the composition, even if it's realist art. We compared realist art, something the artist really saw and tried to paint exactly to non-fiction literature, and imaginative/abstract art to fiction.
I explained that artists use a similar process as writers, starting with a sketch. I showed them Millet's first sketch, and first painting version of The Gleaners, and compared it to their writing organizer and first draft. Then I showed them Millet's 2nd and 3rd sketches for The Gleaners and explained that artists edit and change their paintings just like writers edit and change their stories. I showed a comparison of the first version and the final version and asked students to identify what was different (background up close/far away, colors are different, vertical to horizontal orientation). I asked them if both pictures tell the same story? Do they have the same Main idea? When they weren't sure I asked is it more important if what the women are DOING is the same, or that WHERE they ARE important? They agreed "What the women are doing" is the most important. One student noticed that they ARE in the same place, but that they are closer to the background in the first version, and farther away from the background in the final painting. We confirmed that the MAIN IDEA of the Gleaners was the same in both, just some of the DETAILS had changed.
I showed them an engraving Millet had made of the Gleaners to further illustrate the writing comparison. Finally I showed them a progression slide that has the sketch-first version-new sketch-final-painting-and engraving to compare with the writing process of organizer-first draft-editing-final version-publishing.
We reached the end of the session and half the class had to get ready to leave. While we waited for the bell I reviewed the information we'd covered that day. "What for elements of art do you remember now?" (color, line, shape, space), "Who remembers the title of the painting we looked at?" (The Gleaners) "Can anyone remember the artist's name?" (this was tough) I explained next time we'd be writing about the painting. Cindy suggested I check my knowledge of their names again by selecting students to get packed up to leave.

As the elements of Art lesson took longer, and the fire drill interrupted us, we got a little behind. we've chosen to add a Monday visit to next week to accomplish our writing objectives before the trips come up. We also decided to continue working on the Gleaner, to work more in depth, and perhaps not do the Quilter photograph as a writing prompt. We 'll change the Fur Traders to a narrative writing, as this matches time-wise more with what the students are supposed to be learning in their literacy standards. I may need to change the four-square I made to simplify the information. The kids are much lower level than I'm aware, and I need help making the activities more level-appropriate. This rings true with my idea that residency artists need a lot more professional training on childhood development and different learning speeds.

Wednesday, September 22, 2010

Cindy's Response

The lesson Marie had prepared focused in the Elements and Principles of Design, using an interactive website to enhance it. Marie's description of the sequence of events correlates exactly to my notes; I can add a few more details she left out. Marie accessed students prior knowledge at the beginning of the lesson as she explained the major 'theme' we would be exploring. She explained that she would be with the class until January, and had the students count the months from Sept. to Jan.; to give them a general idea of the length of time we would be working together.

She mentioned we would be studying 'rivers' and asked the children what they knew (accessing prior knowledge). The students mentioned that they had recently learned that there is a big river close to Philadelphia (the Delaware) and another smaller river that feeds into it (the Schuykill). They knew that Wm. Penn liked this location and decided to build a city there.
She then asked who lived in this area when Wm. Penn made this decision, and the students mentioned that 'the Lenape Indians' were there at the time.

She mentioned that not only would she be working on art lessons with them, but also on Literacy lessons, asking them if they could tell her what "literacy" means. The students answered "reading and writing".

She then explained that she would like to know what they already knew about the elements of art. She explained how they would fill in a word from the word bank on the test that fit each definition. As she slowly explained each word and definition, it became apparent that the words and definitions were above their level of understanding. We then put the pre-test on the overhead and went over each definition, explaining the definition in third grade terminology. She waited at the end of each definition to make sure each student had chosen a word that they felt might fit the best.

When this pre-assessment was complete, she handed out their journals and colored pencils. She projected the website on the board. The website demonstrated the technique of making lines with the words, "thick, thin, straight, curved, broken,wavy"and the students in turn drew in their journals a sample of each. Noticing that some were also labeling their lines, she suggested that all do the same, saying,"like we make diagrams in science".
The next section of the website illustrated the difference between 'organic' and 'geometric'. Marie followed the same procedure here, with the students listening and viewing first, then drawing a sample and labeling it.


The website provided 2 samples of artwork that contained these elements, and Marie pointed out elemnets and verbally quizzed them on what kind of line/shape the artist used. Since they had already done their own samples, they excelled at this and seemed quite fluent in identification of the taught elements. At this point, it was time for lunch dismissal.

Day 1!!! Art pre-test and Elements and Principles of Design

Cindy wrote notes too and we will be using this blog to aid in the debriefing process. As we had limited time after the first session, I decided to jot down my own view of what I did, when, why so that the memories would be fresh and ready for our postponed debriefing. On Fridays we will have more time for debriefing in person....

I came in, put my things down, and Cindy was mentioning her "behavior board". I had asked her about her classroom management for behavior/consequences the night before, and it seemed this morning was the first time since the beginning of the year she thought she might need it. So she pulled it out and explained the sticks-in-your-pocket system if students were misbehaving.

I introduced myself and and talked about how we'll be learning art and some other subjects at the same time together. I asked the kids "What other subjects do you learn in school?" (literacy, math, science, social studies, reading, etc. were answered). I also explained I'd see them twice a week until January and asked them to figure out how long that would be (4 months).

In order to learn what they already know I explained we'd be taking a pre-test. We don't have to already know any of the words. This is more of a "fun" test. Passed out the 2 sided art and fiber art pretest. read the vocabulary words in the word box together and asked them to fill in the boxes next to each definition, and guess if they don't know it. We quickly realized that many of the children were having serious difficulty reading the definitions. (The E&P defs were a bit too complicated/didn't use familiar vocab) Cindy quickly copied the test onto a transparency and set up the overhead projector. With the test shown on the board, we read the words again, and read each definition out loud, allowing time for answers to be written, rephrasing some of the definitions.

When test was complete, I said I had a "present" for the students, and they got excited. I pulled out the sketchbooks and said I was waiting for a table that looked "ready" to be the first recipients. I asked the students to write their name on the top front cover, and allowed them to choose crayon, marker, or colored pencil to do so. I readied the colored pencils I'd brought for distribution while Cindy set up the computer and digital projector.

I asked the students to open up to the first page of their sketchbook and select a pencil. I explained we'd be watching some animations of the "Elements and Principles of Design" and that they should watch each clip quietly. I explained that elements were what we use to make art and principles were how we used the elements, and that they might already know some of the words from art class.
We watched the "Line" clip on artist's toolbox twice. I pointed out a thick line and asked them to draw a thick line in their sketchbook. I said thick lines could be as thick as my finger or even as thick as my arm. Some students labeled their thick line, and so we suggested everybody label their lines as it would be like making a diagram in science class. Cindy wrote each vocab word on the board for their labels. We did the same process for "Thin", "Straight", "Curved" (and pointed out that many letters have curved line- a, c, j the students answered), and "Wavy" (I had the kids do a "Wave" like in a baseball stadium before they drew their line). As kids drew I held up some of their examples and described them "Amadea has a SHORT, THICK, BLUE line", "Emily has a LONG, THIN, RED line"
We watched the "Shape" clip and learned the difference between geometric and organic shapes. I asked the students what geometric shapes they knew (circles, squares, rectangles, triangles, octagons they answered). I said geometric shapes usually  had straight lines and edges, except for the circle. I asked the students to draw some geometric shapes on their pages, and if they only drew a circle to include some straight edge shapes too. We looked at the organic shapes and said organic means natural or from nature, like clouds, leaves, trees, animals, or our bodies, and that organic shapes often have curved and wavy lines, not all sharp and straight lines.
At the end I asked the students to return the colored pencils and stack up their sketchbooks. Lunchtime preparation business took over and I said goodbye as the kids left.

I'm pleased with the attention of the group and with how easily Cindy and I fall into a rhythm with each other. I need to ignore the "12:00" as the endtime and think more "11:50" as the end of class. I had hoped to get through a few more clips, but Line and shape were my big ones to accomplish today. The pre-test was too difficult and took longer than expected. There's a big difference between 3rd graders in September and third graders in May!