The students work on writing after Marie leaves, and Friday they finished their compare/contrast essay comparing the Nile River with the Amazon. These numerous writing activities give them the practice of organizing their ideas into a graphic organizer, writing a rough draft, and editing (with teacher help). They then produce a finished piece that is considered their "published" work.
Since Compare/Contrast is a new writing format for an informational piece, I put writing "stems" onto the blank foursquare to get them started. The first square started with the prompt of 'opening statement', then "These two rivers are alike because_______". The students filled in the square with information from the Venn Diagram we had written the day before. The 2nd square began with the stem, "They are also very different! For example, the Amazon River___________". The 3rd square began with the stem, "On the other hand, the Nile River____________". The 4th square was for a concluding statement, which restated the opening statement. The majority of the students were able to fill in the squares with the information they had on their own, a few had difficulty and required teacher support. The final pieces were graded using the Pennsylvania Writing Rubric, and the scores are improving!
In addition, writing is becoming easier and less time consuming for the students as they are getting over their initial frustration and lack of writing experience. Scores will level off, and I will then push again, adding new writing lessons to push them from this new plateau to a higher one. I am pleased with the results that our lessons have brought!
Sunday, October 31, 2010
Friday, October 29, 2010
River features intro
Today we started early to avoid the Halloween-y afternoon mayhem. We gave the kids time to add final details to their projects, which fortunately allowed some kids who had been absent to catch up. When everyone was finished I called 3 sets of students 2 at a time to take a look at some of their choices and ask the class what was the same and what was different. This was to reinforce the compare/contrast idea we introduced on Wednesday as well as to give the kids a chance to conclude the project with a critique of sorts. I also asked the kids what they thought the final product should be: a mounted piece to hang on the wall or a functional piece that would be useful. It was a unanimous decision to have something useful, so I'll be sewing them on the machine to turn them into little ditty bags which they can hold their upcoming timeline book project in.
 It was then time to introduce more river information. Cindy led the students in reading a packet that described rivers in their multiple aspects. Doing the reading helped emphasize main idea and details which we'll continue to stress when we start our river models next week. Cindy had begun a drawing on the board when the reading discussed ports at the mouths of rivers. When the reading began describing source and waterfalls, I continued the drawing so we ended with a full illustration on the board. With this in mind next week we'll have the kids sketch and plan what to include in their river models before we work them in clay.

Day 12, finishing up Rivers of the World

On Wednesday when I came in, Cindy was having the kids review the "6-pack" for the Amazon river to transform the important points into sentence form. We hadn't done our 6-packs (the people, houses, plants, animals, problems, and uses) for the Nile, Volga, and Yangtze the other day in hopes to get lots of stitching done. So after they had completed the Amazon facts, we picture-walked through a book on the Nile River, with Cindy reading out loud, the students taking notes to add to a new 6-pack, and me writing down main points on a large sheet of paper to mirror the Amazon one they'd completed. This set us up perfectly for a Venn diagram organizer for a compare/contrast writing. I believe this was the first time they'd been introduced to the compare/contrast format and concept. With diagram handouts in the kids hands and a larger Venn diagram poster on the board I elicited what was the same about the Nile and Amazon to put in the overlapping section, and then what was special and different for each of the rivers to put in the left and right sides of the diagram. The children naturally made comparison statements like "The Nile is longer than the Amazon", and I pointed out that we use sentences like that a lot when making comparisons, especially using words such as less/more and -er endings. It would be great to continue this idea with some images, and perhaps we can spend a few moments tomorrow on comparing their maps to reinforce the idea of compare/contrast. Images are great for this kind of activity, and compare/contrast is an essential form for writing about art and aesthetics. With the Venn diagrams complete, Cindy collected them for use in their next writing assignment.

We brought up the overhead transparency of our Rivers of the World map to review which rivers have been studied and stitched so far (Mississippi, Amazon, Nile, Volga, and Yangtze), we counted out how many that was (5) and compared that to how many continents there are (7). I asked them which continent we hadn't done yet (Australia) and also asked why we weren't going to stitch any rivers in Antarctica (nobody lives there and it's too cold there for rivers to flow). We passed out the Atlases and had them find Australia and its major river (the Murray-Darling). I compared it to the Amazon river because both have their sources up in the mountains, and I compared it to the Nile river because both start as 2 separate rivers that join and have one mouth. We discovered a new word for a body of water-- the Murray-Darling's mouth is in the Great Australian Bight (a shallow, curved bay). As always I asked them to find the source of the river as their starting point for stitching and the mouth as the end point for stitching the river. I'm hoping this process of starting and ending in stitching will reinforce the idea of the beginning and end of the river and direction a river flows.

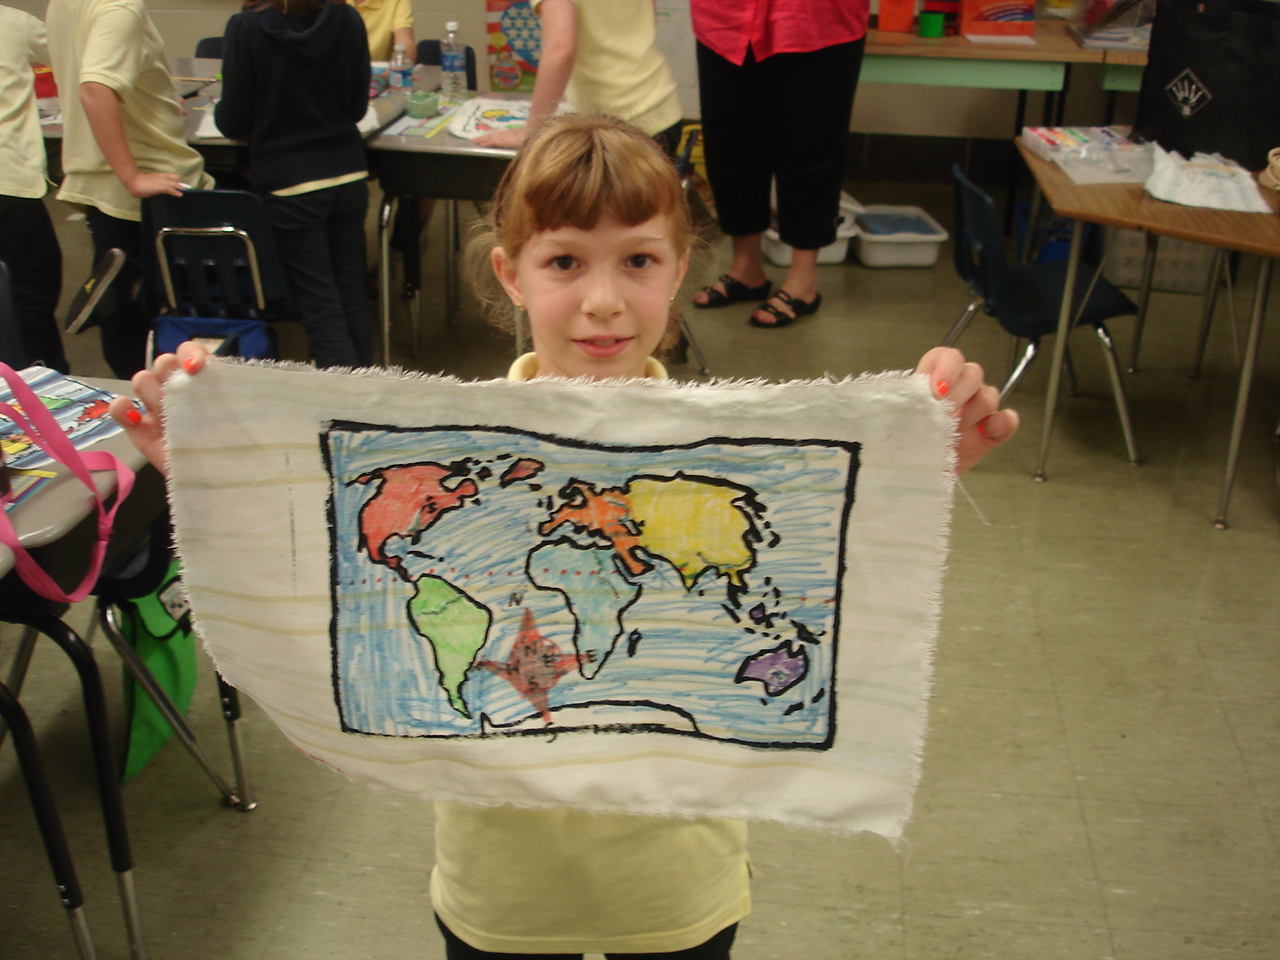
 Students quickly finished their stitching and as we had plenty of time, I brought out my fabric markers. I told them this was their chance to make their map their own and unique. I mentioned some options such as coloring in the continents like the map on the classroom wall, labeling the continents and the rivers, adding details to each continent and river based on the information they had learned from our six-pack exercises, etc. The children were VERY enthusiastic about coloring these in and were quite inventive in the details they added. Some added compass rose and cardinal directions, some created a color-coded map key, some wanted to add the equator, some drew animals and fish in the land and water. They had a clear idea about what should be on a map!
Now my challenge is making a final decision about how to make these more "finished" pieces in terms of the edges. I could either mount them on boards and tape the edges at the back, or I could be more labor intensive and add a backing fabric and seam the edges........

Wednesday, October 27, 2010
Literacy Goals are Moving Along!
Yesterday, after spending 2 weeks doing DRA's (Developmental Reading Assessments), I see some good progress! After 8 weeks in school, the children that I gave the assessments to had made considerable gains. One student went up 2 levels! Using art as a basis for teaching writing skills and supplementing those with Guided Reading (small group reading at their level focusing on comprehension skills), is starting to show some definite progress in both reading and writing. We have completed 4 pieces of writing, from graphic organizer to rough draft to edited copy. From those 4 pieces, all students have gained at least 2 points (10%) improvement. This improvement in only 8 weeks is very impressive to me. I have been teaching third grade for 7 years, and am quite impresssed. Most students have raised their scores even more. We are beginning our 5th piece tomorrow, with a compare/ contrast essay on the Nile River and the Amazon River. Both rivers have been stitched on the students Map of the World Fabric Piece.
We have done 2 Main Idea/Detail activities, Teacher modeled first, then student completed independently. The first was on a piece of non-fiction on Rivers, the second on Canals. This literature follows our theme. Informational writing follows this format also, however the students find it much easier to recognize the Main Idea when they have written it themselves! This intricate web of daily activities wrapped around our Teaching Artist and activities is starting to blossom, and the evidence is slowly emerging!

We have done 2 Main Idea/Detail activities, Teacher modeled first, then student completed independently. The first was on a piece of non-fiction on Rivers, the second on Canals. This literature follows our theme. Informational writing follows this format also, however the students find it much easier to recognize the Main Idea when they have written it themselves! This intricate web of daily activities wrapped around our Teaching Artist and activities is starting to blossom, and the evidence is slowly emerging!

Saturday, October 23, 2010
Rivers of the World: Asia, Europe, and Africa
Today was a big catchup day. We decided to just do embroidery of the various rivers instead of doing an individual book exercise, then stitching. We reviewed the names of the continents and rivers we've learned so far. We had the kids work with the atlas, which they seem to be getting more familiar with. First we found Africa, and the kids quickly located the Nile. We noted the source in Uganda, that it travels through 3 countries, is the longest river in the world, and that the mouth is in the Mediterranean Sea. I had pre-threaded the needles today to help us get started faster. I was able to show them a new stitch- Whipped running, and several students used it.
We moved our hoops over to look at the continents of Asia and Europe. We sang the continents song again. We located the Volga River which sort of helps divide the continents of Europe and Asia. After they stitched the Volga we traveled across Asia to find one of the major rivers in China. We noted the location of the Yangtze, its source, and its mouth at the Sea of China. Some students were able to finish stitching the Yangtze, but others have not yet. It was time to get cleaned up and ready for the bus.
After today, to complete the project we only need to have the Yangtze and a river in Australia stitched. To review the Houses, People, Plants, Animals, etc. Cindy and I discussed just focusing on the Amazon and the Mississippi, and having the kids create a Venn diagram in their sketchbooks to compare and contrast. Some additional details can be added to their maps based on the information gathered. We're concerned with the kids' reading progress and need to find more ways to work in the literacy goals. As we'll be moving on to our river model, I recalled seeing a grade-appropriate description of river features in Cindy's collection of materials during our planning sessions we can use next week.
Thursday, October 21, 2010
Trip to RiverBend Environmental Center
This trip ( our last trip) gave the students exposure to the concept of 'tributaries' which "contribute" to rivers. It also gave them a close-up look at living things that grow and live by streams and rivers. The first lesson set involved an immersion in the culture of the Lenape Indians. We will use this as a basis for a Compare/Contrast writing. The second lesson set was the concept of a "watershed". They use a scale model of a community, they use everyday pollutants in a manner the children understood, they let the students create "rain" and the students observed the pollutants enter the stream through runoff from the land. This reinforced the concepts of "mouth" of the river as they watched the stream/river drain into what would have been a larger body of water. The larger body of water was represented by a "drain". Fortunately, we had a reading activity (again focused on Main Idea/Details) about Rivers, and the terms drainage basin, mouth, source, and others were in the passage. The students were delighted to see the model of the Watershed, and to see that it had an actual DRAIN! Talk about an AHA! moment!
Coast Guard Station/Philadelphia Fireboat Station Lesson
Trip to US Coast Guard Station/Philadelphia Fireboat Station on the Delaware in downtown Philly
Another fabulous trip! The students started out on the bus noticing the difference between the rural landscape they had seen the previous week and the urban landscape they were seeing on this trip. We saw lots of industrial buildings, rowhouses, traffic, and other urban features along the highway. I noted out to them that once again we were traveling along a "River Road"-this time it was the Delaware Expressway-also known as I-95. They were surprised to see little glimpses of the Delaware River as we rode along the highway. I reminded them that it was the SAME river, and they absorbed the contrasting features. This set us up for the visit to the US Coast Guard Station/Phila Fireboat visit.
As soon as we arrived, the students noted the difference between the calm boarding of the boat up in Bucks County and the hectic entrance to the Coast Guard Station. There were men in uniform all around, we were told no photos were allowed, and the adults had to produce photo ID to get in. We proceeded to the rear of the building where the fireboat was located, and boarded the boat. Marie's description of this part of the trip is quite exact! The pilot let us into the control part of the boat in small groups and explained the double steering feature, the many buttons, and the water control systems. The kids were interested in the two big steering wheels but not much else! They were more interested in shooting the water out of the firehouses, which again Marie explained beautifully!
This trip really gave us the background knowledge we needed for the lessons on the difference between rural, suburban, and urban communities. This lesson comes up soon and I will be able to refer them back to what they noticed on the trip! The lesson involves reading an excerpt from EDHELPER, and focusing on main idea/details as they read.
We then boarded the bus for the Penn's Landing part of the trip. The point of this part was to give the students an incredible view of an incredible bridge (Ben Franklin) and to have them understand that the City of Philadelphia recognizes the historical importance of this port/landing area. We looked at all of the landmarks that were placed there for tourists- the Wm. Penn Timeline; the diagram of all the types of ships that had traveled through the port; and the scale model of the Delaware carved on the concrete. Marie describes this part nicely!
This part of the trip gives the students background knowledge that we will explore later in terms of Continuity and Change, as the port still has some features that were there long ago, and other features that have changed.
Wednesday, October 20, 2010
Amazon River
Today we were back in the classroom. It was a little weird having all those trips to skip back to our previous subject matter. Our goal was to cover the Amazon river of South America in our Rivers of the World exploration. We started off looking at the atlas to locate South America and its rivers. The students quickly found the Amazon. I asked them to find the equator, which was also a little blue line, but didn't meander. We also pointed out the equator on the globe to show how it went all the way around the world. I explained how it was always hot near the equator and Cindy reminded the students of previous discussions about climate and seasons.
We then gathered the students and I read a book on "Rainforests", highlighting the Amazon region. Reading the book brought up many of the people, plants, animals, problems, and uses of the Amazon River. Cindy created a word splash for our vocabulary as I read and we explained. Cindy then did a picture walk on 2 books about the Amazon specifically as the students took notes on the people, houses, plants, animals, problems, and uses. I don't know if it was because of the content presented or because the kids were more familiar with the note-taking process, but our chart for the Amazon seems much more full than the one for the Mississippi. Throughout the lesson Cindy and I made comparisons between what we were introducing to what the students had already learned in class and on the fieldtrips.
To complete our Amazon lesson we passed out the students' world map embroideries. I reminded them of how to move the hoop and reviewed the tool vocabulary. I traced the path of the river on the overhead transparency and reviewed source and mouth vocabulary. We quickly passed out the materials and helped the students thread and knot to be ready to stitch.
Once again we went overtime, and the art portion was very rushed. I'm wondering how it might work to do the atlas portion, then stitch the river, then do the book activities and chart. I wanted the students to add imagery based on the 6 chart points for rivers, but there hasn't been time. Perhaps as a culminating activity instead, students can work on the continent/river they found most interesting to add detail to the map when we're finished stitching. Cindy noted that last year I had the students do a practice/free embroidery before they worked on their final projects. I didn't do it this time because of how pressed for time we are. I think the stitching was better on the first day. They really need another review of technique.
Today was a bit difficult because the kids had a half day and there was a lot of nervous energy and noise. Hopefully on Friday we'll be more on task.
Saturday, October 16, 2010
Riverbend trip


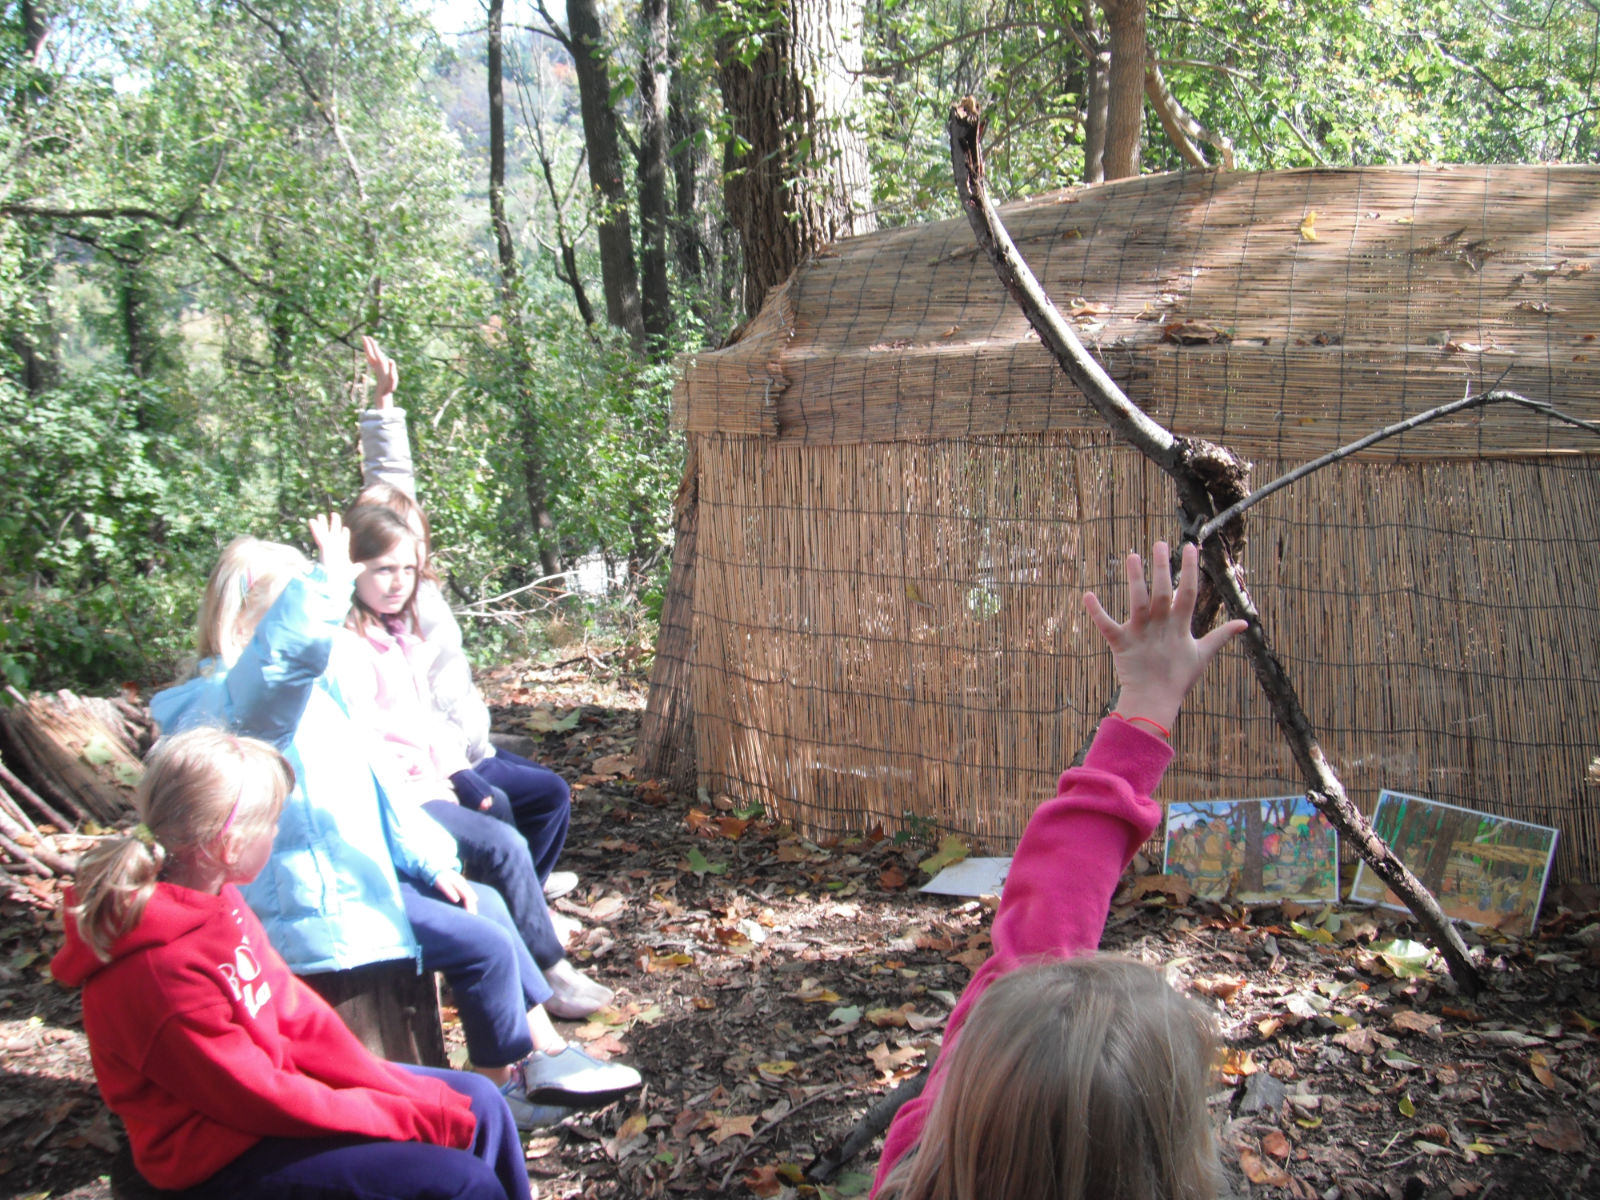
Next we experienced "Home and Hearth", consisting of a child-size model of a Lenape longhouse covered in reed mats, a fire ring and tripod. The children trooped inside the longhouse and sat on furs and reed mats.


Vanessa showed many items typical of Lenape life, including soft leather loincloths,skirts, and shirts, embroidered moccasins, corn husk dolls, a baby doll on a cradle board, and various musical instruments. The children got to handle and try out all of the items. (unfortunately our first, originally working video camera froze up at this point!)

Moving on we learned about "Hunting and Fishing". We had already learned deer were one of the animals hunted by the Lenape, but Vanessa showed us the furs of many other animals of the forest, including bear, beaver, coyote, squirrel, fox, and rabbit (the softest!). She also showed us a picture of the Lenape's favorite fish to catch: a 12 foot long sturgeon that could feed an entire village for days. Sturgeon are no longer swimming in the Schuylkill, nearly fished to extinction and forced from their habitat, but some still swim in the Delaware (As my husband who works on the Delaware Riverside can attest!).
 |
| that's how long a sturgeon was |


 |
| since the videocam failed, I whipped out my sketchbook and watercolors |


Thursday, October 14, 2010
Field trip! Urban Delaware River
This morning we had our second field trip. We visited the Coast Guard Base on Columbus Blvd to experience the fire department's fireboats. Tide was almost out, so we had to walk down a steep ramp to the floating dock. Two ships were tied up at the dock- a brand new pumping boat and a 60-year old workhorse which we were told helps the Coast Guard chop up ice floes in Winter. We boarded the pump boat and the groups went up one by one into the wheelhouse to hear the pilot speak. I kept an eye on deck, so Cindy will have to elaborate. While the groups waited their turn I tried to engage the kids in thinking about what they saw along the river and how it was different from our previous ship. The children were very excited to see ducks, seagulls, and a very small school of fish in the water.
After the talk the pilot asked the engineer to start up the pumps. The boat has three spray nozzles: one on the bow of the boat which swivels left and right, one at the stern which swiveled up and down and left and right, and one very large one on top of the wheelhouse that shot the water nearly straight up. The students had great fun taking turns controlling the direction of the spraying water, pretending to put out fires. It was even more impressive when all three nozzles were going at full force!
After that great adventure, the pilot took us on a tour of the rest of the pier. We looked at a buoy boat which checks on and places red and green buoys in the river to direct the boat traffic. We also saw various police boats. Some were very small and fast, others had removable sides for aiding in rescue and to allow divers to ease into water. We saw a Pilot boat which takes a pilot out to a ship to steer a foreign ship up the river. On the opposite bank of the river we viewed huge container crane elevators that lift container boxes onto ships. We saw a stack of orange shipping containers, and even saw one drive by on the bed of a truck. This helped explain how goods are brought from other countries, like toys and food, in big containers and then set onto trains and trucks to carry throughout the country. The Pilot also explained that it's the Coast Guard's job to protect us and to inspect the goods and people that come into our port cities on boats.


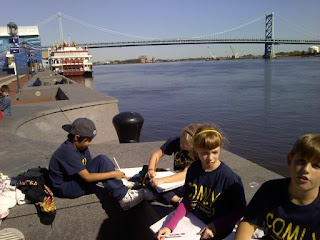
Saying goodbye to our pilot, the kids hopped back on the bus to make a short trip to the Great Plaza at Penn's Landing. We ate lunch at the riverside- a challenge with all the hungry seagulls about! There's a very detailed engrave scale model of the Delaware River along the promenade, so after lunch we lined the kids up for a follow-the-leader down the river. Before we started I asked if they remembered in which state was the river's source (New York!), and then as we go down the river what state is on our right (PA!), and on our left (NJ!) and where is the mouth of the river (Atlantic Ocean!). Walking down the river we noted all the tributaries and major cities along the path. We had enough free time to allow for some sketching. I helped one boy do a grid enlargement of the river engraving he wanted to draw so much. I drew out a grid on his page after asking him to count how many tiles there were. Then we looked at each tile and found the lines to match up with the squares on the page. Other students drew the Ben Franklin bridge, and others noted the many birds about.

We took one last stroll down to a Steamboat docked at the landing, then returned to the bus and back to school. There's so much new information to think about! I'm eager to get back into the classroom so we can process these ideas with our art projects and writing. One more Field trip to go on Friday!

Wednesday, October 13, 2010
Sunday, October 10, 2010
Delaware River Trip- Rural (Cindy)
This trip to Upper Bucks County to ride on the Bucks County Riverboat and then travel down River Road to the Pedestrian Suspension Bridge and a lesson on the Canal System took an enormous amount of planning, which was well worth it! Every minute was accounted for, especially the amount of time spent on the bus. If we lost any time on the ride, it would have a snowball effect on the rest of the trip. The trip started out 20 minutes late as the bus didn't arrive on time. Add to that the driver had no idea of where were going and how to get there! I explained the time constraint to the driver, and she was eager to do her best to get us to the boat, back on the bus, and to the bridge; all the while being aware that she also had her own route to come back to at the end. This meant not a minute to spare!
Captain Dee had e-mailed me directions in case the driver didn't know the way. His directions were longer, but followed the highway that ran alongside the river. This allowed the students to experience firsthand how communities change along a river. We will re-examine this concept on Monday. The ride took us through incredible types of landscapes that a lot of the students hadn't seen before, ponds, animals, farmhouses and streams were abundant!
I had picked up 30 maps printed by a company called "Resort Maps" which depict an artist drawn aerial view of the exact areas we would be visiting. These maps are actually quite kid-friendly, they are printed in color and present life-like drawings of the area and its' landmarks from a bird's eye view. This helps the students get a perspective of location and movement, and it was a wonderful asset to have. We will be referring to this map numerous times during the course of this unit.
I had discussed with Captain Dee that we are focusing on the people, plants, animals, houses, uses, and problems of living close to the Delaware River; and he did a wonderful lesson in pointing out these things and providing ancedotal stories (a bridge that had dislodged during a flood was used by a neighboring town; a struggling 19th Century artist tricked coal boats into throwing pieces of coal at a silhouette he had constructed so that he could collect the coal -free- at the end of the day) as we floated along the beautiful river. The students were completely engaged, and were able to easily access prior knowledge from the previous lesson. He was impressed with their 'on the mark' answers to his questions.
We then drove to Bull's Island State Park, where we had a scheduled Canal lesson from a Park Historian. A Pedestrian Suspension Bridge crossing the Delaware River connecting Pa and NJ is located there. We had a quick lunch break, students crossed the bridge, laughing as they "crossed" into NJ. We experienced the special trait of a suspension bridge, the movement or bounce of the bridge that differentiates a suspension bridge from other types of bridges, again frontloading the students with experience that enhance their learning and understanding of bridges, when that lesson comes up.
The lesson on canals was good (the students were getting tired at this point), the definition of a canal as a "road for boats" and of the need for locks "elevators for boats" along the canals will be further explored in a lesson on Main Idea by me on Monday. The historian, Mrs. Vicki Chirco, gave me handouts and other materials that I can use for reading comprehension and map skills. The best part, of course, was the model of a lock and a model of a swing bridge. Models are incredible tools for allowing students to visualize what is too large or inaccessible to see. I will find other examples of visual models of these on United Streaming to further explain the need for canals, and thus locks and swingbridges.
This experience gave us the information we will need on Monday to begin writing a Sequence Narrative (different from a Problem/Solution Narrative)
Saturday, October 9, 2010
Rivers of the World-Lesson One-North America (Cindy's Post)
The first Rivers of the World lesson was on the Mississippi. I wasn't able to pre-load the kids with any information as we needed them to take the Science and Social Studies pre-test without any previous exposure. This meant the lesson had to follow the pre-test, and still have enough time for the kids to learn how to do a running stitch and then apply it to their fabric Map of the World. I took over the academic portion of the lesson to get a solid start (Marie could have easily handled this, but we were crunched for time!)
We began with Marie's reading of "Living Near a River", which the students thoroughly enjoyed. We created a Wordsplash of the word "RIVER", which the students copied in their sketchbooks.
We then got out our atlases and found the rivers in North America, noticing how they meandered and at times fed into other rivers. We noted that a lot of the time, the rivers became the boundaries for the states.
We then focused on the Mississippi River and noted how it separated the states. We found where it began (the source) and where it ended (the mouth, which was where it took on the shape of a DELTA). We noted that it emptied into the gulf of Mexico.
I then did a picture walk of a book on the Mississippi River, where we took notes on sticky notes when we heard or noticed facts pertaining to its PEOPLE, ANIMALS, PLANTS, USES, HOUSES, and PROBLEMS. We added the sticky notes to a chart I had made. This lesson sets up the type of information we will look for in other books on rivers.
Marie then gave the students the lesson on stitching (the running stitch) and they found the source of the Mississippi and the mouth of the Mississippi, drew a meandering line between them, and stitched their running stitch. Success!
Field Trip!!
This morning we all got onto a big yellow school bus with our students and some parent chaperons for our trip up to see a rural section of the Delaware River. We had the kids bring along their sketchbooks and reminded them to be aware of people, houses, plants, animals, uses, and problems of the river throughout the day. I told them they might want to sketch something they noticed from those categories as we might want to use that information later on in our project.
I was surprised that we took mainly back roads and no major highways on the ride up to Upper Black Eddy, Bucks County. This route offered numerous opportunities for the children to observe rural community and land features, and they were eager to sketch on the way up. "HORSES!!!!!" was a common cry. Students noted corn-stubble fields, barns and fences, mountains, ponds, geese, deer, small creeks which grew into larger streams as we neared the river, the Delaware Canal, and of course the Delaware River! Mrs. O'Donnell passed out a tourist map of the Bucks County area to the kids mid-trip, and students searched for the boat we would ride on. As they examined the maps I asked them how many bridges they could find, where the canal was and how it looked different from the river (it was thin and straight not wide and curvy), where the compass rose was on the map, etc. Some students were inspired to sketch the map or the boat as they imagined it would be afterwards. This was the first time I'd ever been on a field trip as a student or a chaperon where I felt the journey itself was part of the educational experience!
 When we arrived in Upper Black Eddy, we were greeted by Captain Dee of the Bucks County Riverboat Company. We boarded "The River Otter", a flat bottom pontoon boat which we were told could navigate the river even in 2 foot shallows! Before we launched, Captain Dee asked if we had noticed all the mud on the ramp and dock, and explained that just a week ago the river level was a good 6 feet higher due to massive rain. He also showed us what the highest flood level had been in recent years and told us that people who live near the river often have their houses flooded. Some of the houses must even be rebuilt on stilts to avoid the floods.
 After our boat ride we hopped back on the bus, crossed to NJ over the truss bridge we'd ridden under, and headed downriver to Bull's Island Recreation area. We stopped for a quick picnic lunch, then took a walk over the pedestrian-only suspension bridge which connects NJ and PA at Bull's Island. The kids enjoyed standing in "2 places at once" between the states, and experiencing the vibrations of the suspension bridge.
 We then headed back to the Visitor center lawn for a presentation by a state park historian (I missed her name!). The historian shared maps and pictures of the Delaware and Raritan Canal, and explained that it was built in 1830 by workers with shovels and wheelbarrows to connect trade between Philadelphia and New York City. She told us how the boats were towed up the canal by mules on the towpath. She revealed a working model of a canal lock and explained how the parts worked to lift and lower canal boats like an elevator for going up hills. She also showed us a model of a swing bridge with an A-frame which would allow boats to pass when the bridgekeeper heard their horns blow. I'm not sure how much the kids retained from her talk... there were a lot of bathroom trips, worries about the numerous bugs (daddy long legs and stick bugs!), end-of-trip distraction and tiredness, and the kids were too spread out on the lawn for the historian to really actively engage.

 It was along and exciting trip. What better way for students to learn about rivers than to experience them first hand? I believe this will provide rich background for our further explorations. Back in the classroom I pulled aside pairs of students for quick video interviews about what we've learned so far.
I have to compile the video footage I've shot so far and add it to the post.
I was surprised that we took mainly back roads and no major highways on the ride up to Upper Black Eddy, Bucks County. This route offered numerous opportunities for the children to observe rural community and land features, and they were eager to sketch on the way up. "HORSES!!!!!" was a common cry. Students noted corn-stubble fields, barns and fences, mountains, ponds, geese, deer, small creeks which grew into larger streams as we neared the river, the Delaware Canal, and of course the Delaware River! Mrs. O'Donnell passed out a tourist map of the Bucks County area to the kids mid-trip, and students searched for the boat we would ride on. As they examined the maps I asked them how many bridges they could find, where the canal was and how it looked different from the river (it was thin and straight not wide and curvy), where the compass rose was on the map, etc. Some students were inspired to sketch the map or the boat as they imagined it would be afterwards. This was the first time I'd ever been on a field trip as a student or a chaperon where I felt the journey itself was part of the educational experience!

We motored upriver under a truss bridge that had been built in 1843 and saw lots of logs piled up against its stone supports- further evidence of the recent heavy flooding. Along the way Captain Dee helped the kids brainstorm some of the river animal life. In particular he explained the contrasting spawning habits of the American Shad and the American Eel. The former lives in the ocean and swims up the river to spawn, and the latter lives in the river but migrates all the way to Bermuda and the Sargasso sea to spawn. The kids spotted Turkey vultures circling the New Jersey bluffs and a Great blue Heron at the water's edge. It surprised us all when the Heron took flight and swooped past the boat! Dead fish and turtles were some other notable wildlife. I was impressed by the breadth of Captain Dee's repertoire of information. I wondered if Mrs. O'Donnell had asked him to cover certain topics, as it all seemed wonderfully relevant to our goals.
 After our boat ride we hopped back on the bus, crossed to NJ over the truss bridge we'd ridden under, and headed downriver to Bull's Island Recreation area. We stopped for a quick picnic lunch, then took a walk over the pedestrian-only suspension bridge which connects NJ and PA at Bull's Island. The kids enjoyed standing in "2 places at once" between the states, and experiencing the vibrations of the suspension bridge.

On the bus ride home we encouraged more sketching. I pulled out my own sketchbook and started drawing kids, much to their delight. I was transported back to my school days when my classmates would ask me to draw them and I found my niche as the class "artist".

I have to compile the video footage I've shot so far and add it to the post.
Wednesday, October 6, 2010
Rivers of the World/North America
There was so much to squeeze in today!!!!! We started off with the science and social studies pre-tests. Based on watching them work, they seemed to have a better handle on the vocabulary for science and social studies than they did for the art pretest. I have to mark them and see.
Once the pretest was finished I reviewed the continents we had learned last time. No hesitations, nobody told me states or country or city names, just rattled off the continent names! I asked them what continent we live on (response: North America). Then I asked if they knew what countries were in North America. This was a little harder. They seem to be unclear about the difference between a city, a state, a country, and a continent. These boundaries are so abstract. But finally we got the right response (United States of America, Canada, Mexico).
Cindy and I tag-teamed today. I was a bit unclear about how we were going to use the book resources to step through the people/animals/uses/problems, etc. Cindy led the rivers word splash brainstorm to see what the kids could come up with- and they did successfully generate all the topics we had hoped they would. They got a little carried away with ocean life and really wanted to show off their newfound geology science knowledge, so Cindy reined it in a little.
Then I read a short book titled "Living Near a River" by A. Fowler. This book generated a lot of new vocabulary for the kids, and each page sparked a short related description as Cindy and I bounced ideas back and forth
Cindy then took over leading the kids through a river find in their atlases. There were opportunities to use some of our arts elements vocabulary about lines..thin...curved...colors, as they tried to find things on the map. Then Cindy did a picture walk through a book about the Mississippi river and the kids listened and observed for information regarding people, animals, plants, houses, uses, and problems to write notes for the post-it page of categories. We lacked time today, but I'd like the kids to use some of that information to add imagery to their world maps.
People and animals were the most popular note-taking topics. Obviously those are areas that interest this age group a great deal.
There was very little time left, but my ultimate goal for the day was to get the kids to start stitching their world maps. I had them look at their paper version first to find North America, locate the Great Lakes and the Gulf of Mexico, and trace the path of the river between the 2. Then I asked them to find the same points on their fabric version. Cindy kindly printed out a transparency for me to project, and I marked and stressed vocabulary source, meander, and mouth. I passed around an example of my own embroidery for them to see and feel what the stitches should look like.
We quickly handed out supplies and I instructed the kids how to mount their fabric in the embroidery hoop. I'm calling our needle magnets a "dock" this time instead of a parking spot. And we compared the needle to a boat traveling down the river from the source to the mouth. I showed how to thread the needle and knot the ends and how to do a running stitch following the path they'd drawn.
I'm amazed at how quickly and smoothly the stitching went! Perhaps because Cindy has done this with me before she felt more comfortable helping the kids get started- threading and knotting, checking that they'd done it correctly. Perhaps it seemed to go so well just because we were stitching a short line. But I only saw one kid stitch around the hoop, and everybody had nice small stitches (I had stressed tiny,tiny stitches, too)
I feel very confident about stitching with these kids. Now that I've seen Cindy go through the Mississippi lesson I feel better about being able to lead our other world river lessons. If we'd had enough time today, I would have liked the kids to add images to their world maps with fabric markers or more stitching to show what they understand about the people/animals/uses etc.
I had the flipcam with me, but it's so hard to remember to document when you're in the middle of teaching!
Once the pretest was finished I reviewed the continents we had learned last time. No hesitations, nobody told me states or country or city names, just rattled off the continent names! I asked them what continent we live on (response: North America). Then I asked if they knew what countries were in North America. This was a little harder. They seem to be unclear about the difference between a city, a state, a country, and a continent. These boundaries are so abstract. But finally we got the right response (United States of America, Canada, Mexico).
Cindy and I tag-teamed today. I was a bit unclear about how we were going to use the book resources to step through the people/animals/uses/problems, etc. Cindy led the rivers word splash brainstorm to see what the kids could come up with- and they did successfully generate all the topics we had hoped they would. They got a little carried away with ocean life and really wanted to show off their newfound geology science knowledge, so Cindy reined it in a little.
 |
| River word splash brainstorming |
 |
| lots of new vocabulary today!!!! |
 |
| Mississippi people, animals, houses, uses, problems notes |
 |
| People:Indians, cowboys, fisherman, pioneers.... |
 |
| animals: beaver, buffalo, crocodiles (um-alligators?), armadillo |
 |
| stitched Mississippi |
 |
| a bit of a meander |
 |
| nice small stitches |
I had the flipcam with me, but it's so hard to remember to document when you're in the middle of teaching!
Tuesday, October 5, 2010
Day 5; Cindy's fill-in
As Marie was working with small groups, I rotated amongst the remainder of the class assisting them with the paper copy of the world map of continents. We had decided to keep the colors of the continents uniform, following the colors on the continent map I had posted on the wall. Europe is not a clearly delineated continent, so I had to give the students suggestions as to how to separate Europe (or generally give it a defining border). Raye suggested to the students that there is a body of water they could use as a starting point and estimate from there. The students ran with that suggestion! After the continents were given an identifying color, the students trimmed the map ( a replica of the print) and glued it into their sketchbooks.
The students were then given a copy of their Problem/Solution story to glue into their sketchbooks. They shared their stories with each other, Raye, and myself; and enjoyed listening to other students' stories. They also began sketching for themselves a version of the painting (The Furtraders) that more closely reflected their story. Raye gave a mini-lesson on drawing a boat, one that was 3-dimensional, and a few of the children were able to see the dimensions and re-create it! Those that couldn't quite understand how to draw in 3 dimensions sketched a boat ion 2 dimensions, which turned out just as unique. We can see some beginning artists from this simple activity!
As students were moving at their own pace for this lesson, they were allowed to take one of the Van Gogh books and read more about his life and experiences. I continued to rotate around the room, to add to relevant conversations the students were having, occasionally redirect (though the students stay remarkably on task for these lessons), and to admire sketches.
We were also interupted by an impromptu assembly that took away another 15-20 minutes from the lesson. That announcement did allow Marie to finish the printmaking with the final group.
Winding Bobbins Video test
I picked up one of the flipcams from Raye today (other one had a defect and is on order). So, I decided to experiment with recording and making a video. This is me working through winding all the bobbins of embroidery thread. I learned last year that the kids have a much easier time if they can pull the thread off the bobbins- skeins get all tangled up. Hopefully this will mean less thread wasted.
This is the first time I've ever made my own video- I need to back up a little for it to be in focus. Editing and uploading the videos takes a really long time, though...
This is the first time I've ever made my own video- I need to back up a little for it to be in focus. Editing and uploading the videos takes a really long time, though...
Saturday, October 2, 2010
Day 5: continents and world map screenprint
My perception of Friday's lesson is not as universal as previous days as I was really just working with small groups of students at a time, so hopefully Cindy can fill in what I missed.
I started with a quick review to see what the kids remembered from our previous sessions. (Responded shapes/lines, Van Gogh, one kid remembered Jean-Francois Millet correctly pronounced even!) I said we've been working on a lot of reading and writing lessons, but that we're starting to work on some more social studies ideas now. I brought in my Philly daily map screenprint on fabric to show the kids. I asked them if they could figure out where it was and what the format reminded them of (number grid!). After a few more hints they figured out that my repetition of the map represented a calendar. I explained that screenprinting is a type of printmaking for making copies of something. I compared printing to the computer printer or photocopier, but that a long time ago before machines, artists and mapmakers would use printmaking for creating lots of copies of maps.
On the board I listed several screenprinting terms: screenprint, squeegee, ink. I showed them the screen and carried it above their heads so they could see the light coming through the screen. I said the empty spots where you see light is where the ink goes through and the red stuff (screenfiller) blocks the ink from touching the paper or fabric. I also passed around a squeegee and said it had a handle and a blade. Then I demonstrated (without ink) how to pull the squeegee across the screen to make the ink go through. Then I explained the printing process we'd go through as a group: come back, put on a smock, pick a fabric, place it on the board following the taped outline, 2 people to help hold down the board and screen while one person prints, then to wash hands while I hung their print on the line to dry. I insisted that it was very important that we cooperate, move quickly to get ready and exchange smocks and print because if the ink dried out in the screen it would block up the screen like the red stuff and ruin our image.
I asked them what the image on my screen looked like (response- a map!). I asked them if they knew their continents already (North America! Asia!....) Cindy uncovered a map of the world on the bulletin board and I tried pointing to each continent to see if they could remember any more (Arizona! London!). Cindy said she was going to teach them a song later about the continents, but I'd already planned to share one and asked if she minded if I sang them my version.She said okay and I asked the kids to sing/repeat after me as I pointed to each continent. To the tune of Frere Jacques, "Europe, Asia (repeat), Af-ri-ca (repeat), North and South America (repeat), Antarctica, Australia (repeat)". We sang that twice, and then I pulled out a paper copy of the map we'd be printing (see top of post), and said I'd like them to color in each continent a different color following the colors on the map on the board while the individual groups were back with me printing. Cindy stepped in to run the map diagram portion of the lesson and I went back to set up/start printing.
Each group came through very quickly and orderly. They helped each other put on smocks and print. I let the kids pull at least one stroke towards them across the screen, and then to ensure a complete print, I pulled a second stroke back. We lifted the screen and the kids pulled out their complete print. I wrote their name on the bottom, hung it up, and moved on to the next kid to print. They all followed directions beautifully! We had no big mess!!! I was most afraid of this, since we were in a regular classroom not the art room, and I didn't want any kids to mess up their clothes. One student ,who I believe is an ELL student, lit up when he printed and asked "I do it 100 times?!!" He really enjoyed printing, and I hope through the rest of our art activities he'll be a more engaged and confident learner. Another student, who seems very resistant to working in color for some reason, found printing very exciting and as he watched everyone in his group print kept saying "It's MAGIC!!!"
As I said before, I was not totally aware of what the rest of the class was doing as I worked with each group. At one point there was some boat drawing on the board. Generally, the students seemed focused on work in their sketchbooks. So Cindy will have to fill in here.
At the end of class after I had cleaned up all the screenprinting paraphernalia, I reviewed the vocabulary we had learned about screenprinting with the kids and we sang the continents song one more time. I explained that next time we'd be learning about rivers of the world and stitching on our fabric maps.
There's no way I could have done screenprinting in this way without another teacher in the classroom. Today I really felt like an ARTIST in residence more than a TEACHING Artist in residence because I was really working individually with the kids to go through the printing process. In a way I was a little carried away, because I probably could have changed my orientation in the room so to be more aware of the entire classroom. It's too bad we couldn't have gotten through our rivers of the world series of lessons prior to the trips that are coming up. I hope the kids don't get confused. On Wednesday we need to go through the science and social studies pretests before our North American River lesson starts. We should probably have some animals, plants, people, etc worksheets ready, as I'd like the students to add a detail like that to the map in marker before we start stitching.
 |
| world map image used in screenpint |
I started with a quick review to see what the kids remembered from our previous sessions. (Responded shapes/lines, Van Gogh, one kid remembered Jean-Francois Millet correctly pronounced even!) I said we've been working on a lot of reading and writing lessons, but that we're starting to work on some more social studies ideas now. I brought in my Philly daily map screenprint on fabric to show the kids. I asked them if they could figure out where it was and what the format reminded them of (number grid!). After a few more hints they figured out that my repetition of the map represented a calendar. I explained that screenprinting is a type of printmaking for making copies of something. I compared printing to the computer printer or photocopier, but that a long time ago before machines, artists and mapmakers would use printmaking for creating lots of copies of maps.
On the board I listed several screenprinting terms: screenprint, squeegee, ink. I showed them the screen and carried it above their heads so they could see the light coming through the screen. I said the empty spots where you see light is where the ink goes through and the red stuff (screenfiller) blocks the ink from touching the paper or fabric. I also passed around a squeegee and said it had a handle and a blade. Then I demonstrated (without ink) how to pull the squeegee across the screen to make the ink go through. Then I explained the printing process we'd go through as a group: come back, put on a smock, pick a fabric, place it on the board following the taped outline, 2 people to help hold down the board and screen while one person prints, then to wash hands while I hung their print on the line to dry. I insisted that it was very important that we cooperate, move quickly to get ready and exchange smocks and print because if the ink dried out in the screen it would block up the screen like the red stuff and ruin our image.
I asked them what the image on my screen looked like (response- a map!). I asked them if they knew their continents already (North America! Asia!....) Cindy uncovered a map of the world on the bulletin board and I tried pointing to each continent to see if they could remember any more (Arizona! London!). Cindy said she was going to teach them a song later about the continents, but I'd already planned to share one and asked if she minded if I sang them my version.She said okay and I asked the kids to sing/repeat after me as I pointed to each continent. To the tune of Frere Jacques, "Europe, Asia (repeat), Af-ri-ca (repeat), North and South America (repeat), Antarctica, Australia (repeat)". We sang that twice, and then I pulled out a paper copy of the map we'd be printing (see top of post), and said I'd like them to color in each continent a different color following the colors on the map on the board while the individual groups were back with me printing. Cindy stepped in to run the map diagram portion of the lesson and I went back to set up/start printing.
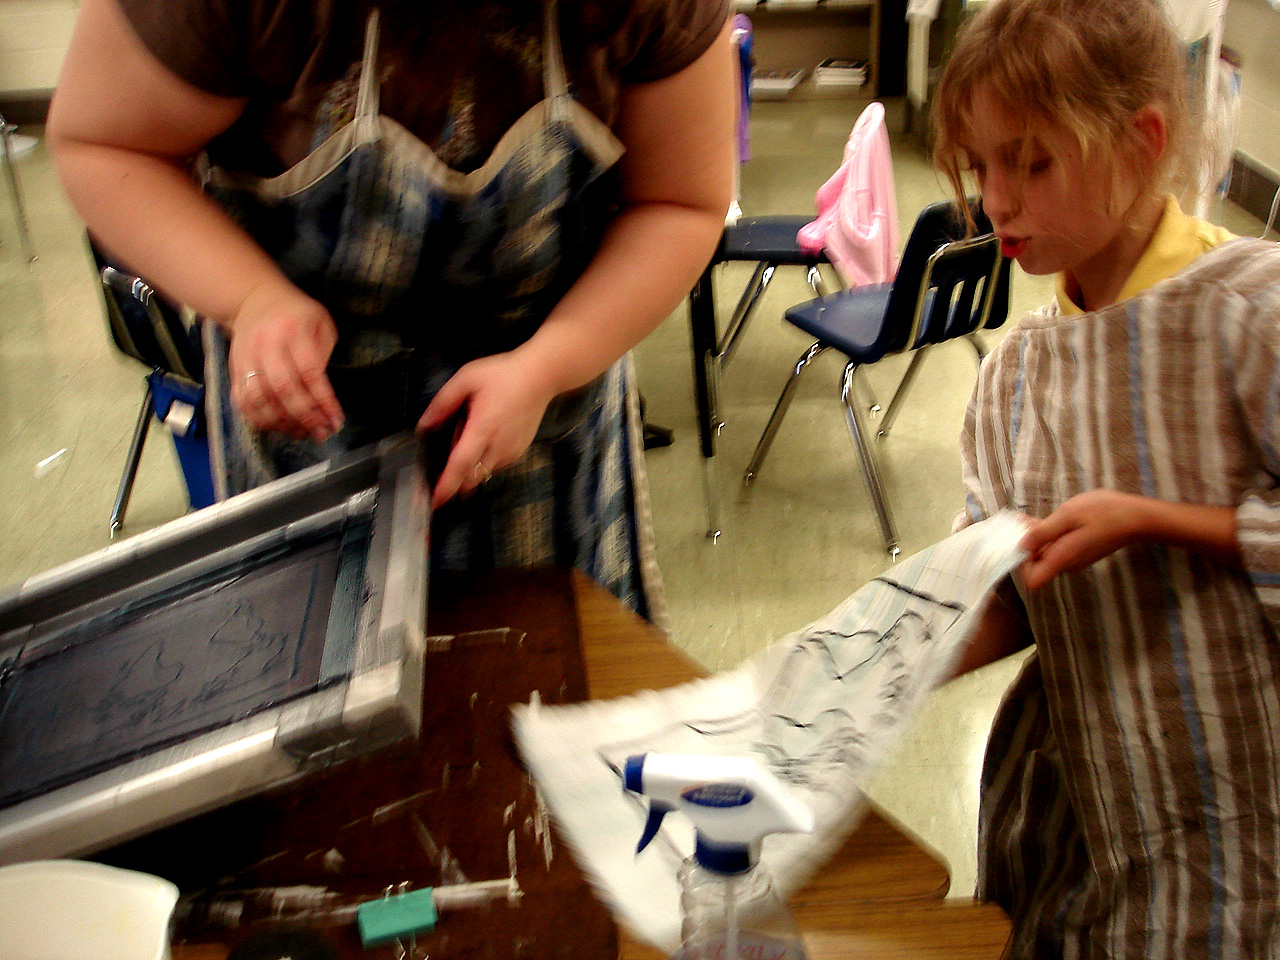 |
| Bailey reveals her print |
As I said before, I was not totally aware of what the rest of the class was doing as I worked with each group. At one point there was some boat drawing on the board. Generally, the students seemed focused on work in their sketchbooks. So Cindy will have to fill in here.
At the end of class after I had cleaned up all the screenprinting paraphernalia, I reviewed the vocabulary we had learned about screenprinting with the kids and we sang the continents song one more time. I explained that next time we'd be learning about rivers of the world and stitching on our fabric maps.
There's no way I could have done screenprinting in this way without another teacher in the classroom. Today I really felt like an ARTIST in residence more than a TEACHING Artist in residence because I was really working individually with the kids to go through the printing process. In a way I was a little carried away, because I probably could have changed my orientation in the room so to be more aware of the entire classroom. It's too bad we couldn't have gotten through our rivers of the world series of lessons prior to the trips that are coming up. I hope the kids don't get confused. On Wednesday we need to go through the science and social studies pretests before our North American River lesson starts. We should probably have some animals, plants, people, etc worksheets ready, as I'd like the students to add a detail like that to the map in marker before we start stitching.
Day 4: Furtraders Narrative ;Cindy's Response
As usual, Marie has done an incredible job of capturing the essence of the lesson in her writing (the previous blog)! I will add that the students noticed a similarity in one of the Van Gogh paintings to The Gleaners. That observation led to a discussion that Van Gogh and Millet were from the same area, and may have seen some of the same types of activities in the community around them. We noticed that the "mood" in Van gogh's similar painting was much 'darker' and briefly discussed the artist's purpose of what he wanted the viewer to see or experience. This observation gave the students an experience in "Author's Purpose", another reading goal we haven't yet explored.
I'd like to note that this experience of writing, brainstorming and recognizing Problem/Solution is a skill not usually fully understood this early in the Third Grade school year. We have only been together for a little more than 3 weeks, and the students seem to have mastered the concept. This will help the students immensely in their reading comprehension. I had never thought to use illustrations or artworks as a springboard for this concept, what an incredible learning experience for me!
As is always the case, time is the enemy in the classroom! There's never enough of it. After Marie left, the students wrote out their Problem/Solutions based on The Furtraders, and they were great! EVERY student exhibited understanding of the concept. I collected them, assessed them, and they are ready to be glued into their sketchbooks next to the foursquare they had used to organize their thoughts. Remember, the foursquare also required them to write and choose who the characters were and the setting, another reading goal!