Showing posts with label elements and principles. Show all posts

Monday, December 20, 2010

Communities and cooperative learning

On Friday we began the next stage of our collaborative wallhanging- community applique/embroideries! When I arrived Cindy was in the midst of a review of the 3 types of communities: rural, suburban, and urban, and was discussing some problems and solutions related to life in each place. Using the color-coded selections of base fabrics I'd brought in for our artmaking, Cindy let each child pick out a fabric with their eyes closed to sort the class into cooperative learning groups. We had a "rural" group of 7 students, 2 "suburban" groups of about 5 students each, and an "urban" group of 7. Once divided up, the students were given a large sheet of paper to come up with 2 problems and solutions each, and a sentence describing life in that locale from each student. Cindy, the reading specialist, and I worked with each group to help keep them on track and mediate the suggestions.
one of the suburban teams

the urban team was talking about crime

another suburban team brainstorms problems and solutions

the rural team works with Ms O'Donnell

each team's report page posted on the board
With the reports on the board we focused on what it was like to live in each place, and what we might see. The rural areas had wide open spaces, lots of trees and fields, and very few houses. The suburban spaces had more houses and businesses, but there was still space between the buildings, yards, and parks. The urban spaces were crowded and noisy, with tall skyscrapers and row homes all in a row, old and new, fancy and run-down, with lots of businesses and places to work. With each description we closed our eyes and imagined what it would like. I had a sample fabric collage for each community type to use as examples of how the compositions might look. I described the concept of applique and collage, and we compared fabric and stitching to paper and glue. I showed the kids the pre-cut squares of fabric, and we figured out some different geometric and organic shapes we could make from the squares. We also brainstormed what the fabric patterns could represent in our communities- an animal fabric could be a vet's office or shelter, a musical notes fabric could represent a music store of concert hall, a red fabric could be a barn or a brick rowhome, money fabric could represent a bank or a store..... With so many ideas bouncing around, the kids were ready to get started. They remained in their groups, and each group was instructed to create an applique composition representing their community type and its features. Cindy and I went around showing the kids how to pin the pieces down so they wouldn't get lost.
Angelica's urban composition with lots of overlapping buildings
 Cindy reminded the kids that this step was the "Main idea" part of the project- simple building shapes with big blocks of color, and warned them not to get too detailed or fiddly.
Emily's rural composition with LOTS of open space

Erin's suburban composition has a school and 2 nicely spaced houses

The suburban team focused on cutting out and placing shapes
The children really understood how different the sense of space was in each type of community, as evidenced by the compositions they created. I was afraid lots of pieces would get lost, so I brought the stack of collages home to zip through the machine and anchor down the tiny pieces. Next time the students will have a chance to embroider details on their towns. 
Lots of open space and few houses in the rural images

some more variety and business in the suburban groups-
 almost everybody included a "school"

The urban compositions are very busy and crowded
lots of overlapping pieces and fabrics representing shops
I felt this was an extremely productive and well-organized day. The students worked well in these more random groupings, and I felt that they really "got it". I've noticed that people of all age groups really respond to fabric collage- it's so connected to our familiarity with things like quilts, that composition comes naturally, moreso than when working with paper.

Wednesday, September 29, 2010

Day 4: Furtraders Narrative

Cindy 's writing with art lesson
Today Cindy presented our lesson centered around narrative writing and I took the debriefer/observer role. It's always fun to watch Cindy teach because she has a great rapport with her students and she's very expressive. She began my reminding the students of the mini-lessons they had worked on for planning a narrative. To mark how the narrative writing is different she asked the kids what kind of writing we had done last time (foursquare! response, informational). She wrote informational and narrative on the board and made sure the kids understood the distinction. She emphasized that when we write we want to make the reader interested and involved, and even entertained.

We passed out sketchbooks and pencils. Cindy passed out booksets about the artist Van Gogh. She said "Pretend these pictures are illustrations in a book, and we have to figure out the problem/solutions of the story". She asked if they knew what an illustration is. She asked the kids to glance through the book, but we weren't reading it today, just looking at the pictures. Some kids recognized Starry, Starry Night from art class. Cindy thought we should have our main idea umbrellas for our elements of art to help us talk, so I quickly drew them on the board.

elements of art main idea umbrellas
First we looked at a self-portrait of Van Gogh. "Does he look happy? Why not?" One boy, Justin, came up with a problem- he must have asked his girlfriend to marry him but she turned him down and now he was sad. This made us adults laugh thinking about poor jilted Van Gogh!!


looking at Van Gogh for problem/solution
 The next page contained a series of black and white reproductions of prints and drawings. "Ooh, these are in black and white..." (They're SKETCHES! was called out). As the kid looked at each image Cindy encouraged them to start off saying "I see..." to describe the scene and then asked them to imagine a problem and solution. She tried to give each student a chance and tried to pull out the quieter kids by calling on them directly. Many creative responses were supplied by the students and they seemed quite excited thinking up new stories from the pictures.

After a few rounds, Cindy asked "Do we all imagine the same story from the same picture?" (response: Nooooo, we all have different stories). "So when we go to a museum do we just walk by each painting and top for a few seconds, uhhuh... whatever...ok... passing by each one? What should you do?" (response: you should stop and make up a story). Some kids had a hard time getting started, and Cindy said "Well, tell me about it... first tell me what you SEE". And when a kid kept continuing with more problems and no solutions she said, "When a reader reads a problem and there's no solution, the reader gets sad or confused, but if you give a solution..." (response: Then the reader really GETS it!).

We came upon a very dark blue image, and Cindy said "What time of day is this? How do you know? Sometimes colors can give us a MOOD". She wasn't sure if she should bring this part of art elements up, but it was a very natural time to do so. I think Cindy knows a lot more about art then she thinks she does, and she led the discussion about the paintings very naturally, using the art vocabulary we had previously covered with the kids. The kids had so much fun making up problems and solutions that what was originally expected to be a preliminary exercise, became the main activity.
It was clear that the students had the concept, so we moved on to the image of the Furtraders on the Missouri. We passed out a new foursquare and copy of the painting for the kids to glue in their sketchbooks. Cindy demonstrated how to glue a page into the book since some had difficulty.
Cindy reviewed which information the kids should put in the boxes:
"First thing is..." (Look at the painting!)
" and then get the"... (information! the Setting! the characters!)... "and maybe the mood"
"then you'll invent a problem and solution"
She said, "Remember what Ms Elcin told us about looking at a painting- find the colors, shapes, foreground, and background. Like, what do you notice about this boat?" (response: Symmetry! It's straight.)
"What kind of a boat is it?" (Canoe) "Would you want to ride in that boat? How does the water look?"
"Let's imagine who these characters are.. friends, enemies, brothers, criminals?"

filling in a new foursquare
 At this point the kids started writing and Cindy and I roamed the room, offering tips, helping kids work out their ideas, and passing out final draft paper. We ran a little short on time, but Cindy said she'd allow them to finish their stories after lunchtime.

writing the good copy
 Before we finished, I wanted to inform them of our next activity, so I showed them a map screenprint I'd done on fabric, and said we were going to start talking about rivers, which was why we chose a river picture to write about today.

I think we have a good energy and cooperation going. The students seem very engaged and I'm hearing a lot of our art vocabulary from them. I'm currently thinking about what I can do about our river background collaborative piece that might connect to Cindy's geology unit somehow. Do you talk about strata?

Saturday, September 25, 2010

2nd Lesson

Marie does such a thorough job in objectively describing exactly what occurred during the lesson! Sequentially, there is not much more for me to add. The debriefing notes that I took during the lesson correspond exactly to her account. I will add "teacher" comments that Marie may or may not be aware of that she is doing as she teaches. Marie has a natural "teacher" ability to intuitively assess student knowledge, which she may not be aware of!

Marie began the lesson again by tapping the students prior knowledge from the previous lesson, and reviewing it with the students. The initial response to "What 2 elements did we learn about the last time I was here?" was students answering random details about the elements. They hadn't organized the elements into 2 "main" elements in their minds so they answered random words which seemed to correctly answer her question to them such as thick lines, geometric, curvy lines, organic, straight lines.

These answers showed that they had absorbed the information, but hadn't organized it in a way that they would be able to access it. I suggested the graphic organizer of using umbrellas for the main idea and the drops under each for the details. I drew the umbrella for LINES and added the drops of straight, curvy, thick and so on; then another for SHAPES with the drops labeled organic and geometric. We have used this graphic organizer before to organize information in a logical way that the kids understand. Marie caught right on and used the same strategy for COLOR, adding 2 drops for primary and secondary, then putting smaller drops under each naming the specific colors. She continuously checked for understanding as and I rotated around the room looking at the student's sketchbooks. Again, the referencing to the literary concept that the students will be exposed to repeatedly, Main Idea and Details!

The lesson then moved on to The Gleaners. Marie's account of this is so thorough, I will just add some things from my notes that she didn't mention. Whenever opportunity arises, I am sure to connect the disciplines so the students are aware that the subjects they learn about are connected. We calculated the years, we referred to the geographic location of France, we connected to student experiences- he had 9 children, he liked to draw the area around where he lived, and so on. The painting we were viewing was "real"; we compared it to a Non-fiction piece of writing, because it was something he "really saw". Marie asked what kind of writing we would compare it to if it were something he had made up, and they quickly replied, "Fiction!"

She then compared artists to writers in that they first sketch (showed the sketch), then paint; whereas the writer first does a rough draft, then writes. He changed his mind, like writers do, etc. She asked if the Main Idea was the same in both, students understood and said yes. She then reviewed the elements of art learned that day, as it was close to dismissal. The final note I added was
ARTIST--Organizer-- SKETCH
WRITER--Organizer--4- square

Friday, September 24, 2010

Day 2: The Gleaner

We like this shared debriefing, so we'll continue. It's interesting to learn each of our viewpoints on what happened.

Today we started at 1:30, Friday afternoon, and the weather and the room were incredibly hot! When I entered the children were working at their centers for the first time- this is a group-independent activity. Today I saw one table working on reading and listening to themselves say poems, one group was doing First in Math on the computers, another was creating an autobiographical picture timeline, another was making a comic strip with dialogue, another was practicing reader's theatre, etc. It was great to see that Mrs O' Donnell uses artistic and creative activities to help kids learn all the time.

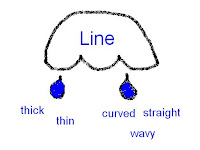
I started off by learning all the kids' names by table, and reviewing them as we'd run out of time in the first session.Then we began by reviewing what was learned the lesson before. "What elements of art did we learn on Wednesday" (kids responded geometric, organic, etc), Cindy showed me the Main Idea Umbrella and detail raindrops organizer the kids have been using. We drew 2 big umbrellas on the board for our 2 elements learned so far and I elicited what big idea geometric and organic falls under (SHAPES!). I then elicited LINE and supporting details thick, thin, curved, straight, wavy, etc. I explained we would learn one or 2 more elements that would help us talk about art.
At this point we got interrupted by a fire drill! Luckily I'd already been through one at Comly and was familiar with the route. While waiting outside I tried to remember their names now that they were all mixed up, not by table order. When we came back upstairs I had the kids do some breathing exercises to help them calm down and cool down from the jaunt outside and down and back up the stairs.
I asked for a helper table for passing out our pencils and sketchbooks, and Cindy helped set up our computer and projector. I played the video from artist's toolkit  for color, which shows primary and secondary colors twice. I did call and response for "Red, Yellow, Blue, Primary too, Primary Colors, Red, Yellow, Blue". I drew the main idea umbrella for Color with details Primary and the supporting details of individual color names on the board. I asked the students to find their red, yellow, and blue pencils to make their personal notes/diagrams in their sketchbooks, labeled primary colors. After checking around the room and sharing how some of the students had organized their information, I did the same for Secondary colors. I did call and response for "Orange, Purple, Green, Secondary, Secondary colors, Orange, Purple, Green", and had the students mark their sketchbooks with secondary colors.
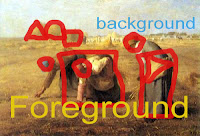
I brought focus back to the screen to play the "Depth" clip on the artist's toolkit website. I pointed out how shapes are big in the foreground to show they are close to us, and shapes are small in the background to show they are far away from us. I played it again so the students could make note of where objects were placed in the picture and how their sizes made the space convincing. After some more questions from the students, we got ready for the next step.
I asked the students to get out a gluestick and turn to a fresh page. We'd been working with only one page visible, but I wanted them to open it up flat with two facing pages empty and with the book turned. I selected a student from my helper table and pulled out the photocopies of The Gleaner to pass out. Ms McCaffrey, our  resource support teacher reminded me I should tell them which orientation to paste the picture into their books. We passed out the copies and the students glued it in their sketchbooks. I pulled up a powerpoint for The Gleaner on the screen. I had the kids write down the title, artist's name, and date. I asked them to repeat the name after me "zhawn-franswa meelay" (Jean-Francois Millet). I compared the image info with the title and author of a book. While they wrote, I told them about Millet's life, born on a farm, had 9 kids, often painted life he saw in the countryside in France. Looking at the date we noted it was in 1857, about 150 years ago- Cindy reminded the kids about how they have been learning how to subtract years to figure out time between events. I asked them if they or I or Ms O'Donnell were alive in 1857 (Nooooo). I said we could put images into time lines and asked them if William Penn, whom they'd been studying, came before or after this picture, (before).
We looked at the color image of The Gleaners, and I asked the students what colors they saw (green, white, blue, orange, etc). I asked them what shapes they saw in the image (circles, rectangles, squares) and asked them to trace over their copy to find the shapes they saw. I explained all artworks use basic shapes for the composition, even if it's realist art. We compared realist art, something the artist really saw and tried to paint exactly to non-fiction literature, and imaginative/abstract art to fiction.
I explained that artists use a similar process as writers, starting with a sketch. I showed them Millet's first sketch, and first painting version of The Gleaners, and compared it to their writing organizer and first draft. Then I showed them Millet's 2nd and 3rd sketches for The Gleaners and explained that artists edit and change their paintings just like writers edit and change their stories. I showed a comparison of the first version and the final version and asked students to identify what was different (background up close/far away, colors are different, vertical to horizontal orientation). I asked them if both pictures tell the same story? Do they have the same Main idea? When they weren't sure I asked is it more important if what the women are DOING is the same, or that WHERE they ARE important? They agreed "What the women are doing" is the most important. One student noticed that they ARE in the same place, but that they are closer to the background in the first version, and farther away from the background in the final painting. We confirmed that the MAIN IDEA of the Gleaners was the same in both, just some of the DETAILS had changed.
I showed them an engraving Millet had made of the Gleaners to further illustrate the writing comparison. Finally I showed them a progression slide that has the sketch-first version-new sketch-final-painting-and engraving to compare with the writing process of organizer-first draft-editing-final version-publishing.
We reached the end of the session and half the class had to get ready to leave. While we waited for the bell I reviewed the information we'd covered that day. "What for elements of art do you remember now?" (color, line, shape, space), "Who remembers the title of the painting we looked at?" (The Gleaners) "Can anyone remember the artist's name?" (this was tough) I explained next time we'd be writing about the painting. Cindy suggested I check my knowledge of their names again by selecting students to get packed up to leave.

As the elements of Art lesson took longer, and the fire drill interrupted us, we got a little behind. we've chosen to add a Monday visit to next week to accomplish our writing objectives before the trips come up. We also decided to continue working on the Gleaner, to work more in depth, and perhaps not do the Quilter photograph as a writing prompt. We 'll change the Fur Traders to a narrative writing, as this matches time-wise more with what the students are supposed to be learning in their literacy standards. I may need to change the four-square I made to simplify the information. The kids are much lower level than I'm aware, and I need help making the activities more level-appropriate. This rings true with my idea that residency artists need a lot more professional training on childhood development and different learning speeds.

Thursday, September 23, 2010

The Gleaners

Jean Francois Millet, The Gleaners, 1857
Getting ready for descriptive writing and use of the four square organizer while looking at art!

Wednesday, September 22, 2010

Cindy's Response

The lesson Marie had prepared focused in the Elements and Principles of Design, using an interactive website to enhance it. Marie's description of the sequence of events correlates exactly to my notes; I can add a few more details she left out. Marie accessed students prior knowledge at the beginning of the lesson as she explained the major 'theme' we would be exploring. She explained that she would be with the class until January, and had the students count the months from Sept. to Jan.; to give them a general idea of the length of time we would be working together.

She mentioned we would be studying 'rivers' and asked the children what they knew (accessing prior knowledge). The students mentioned that they had recently learned that there is a big river close to Philadelphia (the Delaware) and another smaller river that feeds into it (the Schuykill). They knew that Wm. Penn liked this location and decided to build a city there.
She then asked who lived in this area when Wm. Penn made this decision, and the students mentioned that 'the Lenape Indians' were there at the time.

She mentioned that not only would she be working on art lessons with them, but also on Literacy lessons, asking them if they could tell her what "literacy" means. The students answered "reading and writing".

She then explained that she would like to know what they already knew about the elements of art. She explained how they would fill in a word from the word bank on the test that fit each definition. As she slowly explained each word and definition, it became apparent that the words and definitions were above their level of understanding. We then put the pre-test on the overhead and went over each definition, explaining the definition in third grade terminology. She waited at the end of each definition to make sure each student had chosen a word that they felt might fit the best.

When this pre-assessment was complete, she handed out their journals and colored pencils. She projected the website on the board. The website demonstrated the technique of making lines with the words, "thick, thin, straight, curved, broken,wavy"and the students in turn drew in their journals a sample of each. Noticing that some were also labeling their lines, she suggested that all do the same, saying,"like we make diagrams in science".
The next section of the website illustrated the difference between 'organic' and 'geometric'. Marie followed the same procedure here, with the students listening and viewing first, then drawing a sample and labeling it.


The website provided 2 samples of artwork that contained these elements, and Marie pointed out elemnets and verbally quizzed them on what kind of line/shape the artist used. Since they had already done their own samples, they excelled at this and seemed quite fluent in identification of the taught elements. At this point, it was time for lunch dismissal.

Day 1!!! Art pre-test and Elements and Principles of Design

Cindy wrote notes too and we will be using this blog to aid in the debriefing process. As we had limited time after the first session, I decided to jot down my own view of what I did, when, why so that the memories would be fresh and ready for our postponed debriefing. On Fridays we will have more time for debriefing in person....

I came in, put my things down, and Cindy was mentioning her "behavior board". I had asked her about her classroom management for behavior/consequences the night before, and it seemed this morning was the first time since the beginning of the year she thought she might need it. So she pulled it out and explained the sticks-in-your-pocket system if students were misbehaving.

I introduced myself and and talked about how we'll be learning art and some other subjects at the same time together. I asked the kids "What other subjects do you learn in school?" (literacy, math, science, social studies, reading, etc. were answered). I also explained I'd see them twice a week until January and asked them to figure out how long that would be (4 months).

In order to learn what they already know I explained we'd be taking a pre-test. We don't have to already know any of the words. This is more of a "fun" test. Passed out the 2 sided art and fiber art pretest. read the vocabulary words in the word box together and asked them to fill in the boxes next to each definition, and guess if they don't know it. We quickly realized that many of the children were having serious difficulty reading the definitions. (The E&P defs were a bit too complicated/didn't use familiar vocab) Cindy quickly copied the test onto a transparency and set up the overhead projector. With the test shown on the board, we read the words again, and read each definition out loud, allowing time for answers to be written, rephrasing some of the definitions.

When test was complete, I said I had a "present" for the students, and they got excited. I pulled out the sketchbooks and said I was waiting for a table that looked "ready" to be the first recipients. I asked the students to write their name on the top front cover, and allowed them to choose crayon, marker, or colored pencil to do so. I readied the colored pencils I'd brought for distribution while Cindy set up the computer and digital projector.

I asked the students to open up to the first page of their sketchbook and select a pencil. I explained we'd be watching some animations of the "Elements and Principles of Design" and that they should watch each clip quietly. I explained that elements were what we use to make art and principles were how we used the elements, and that they might already know some of the words from art class.
We watched the "Line" clip on artist's toolbox twice. I pointed out a thick line and asked them to draw a thick line in their sketchbook. I said thick lines could be as thick as my finger or even as thick as my arm. Some students labeled their thick line, and so we suggested everybody label their lines as it would be like making a diagram in science class. Cindy wrote each vocab word on the board for their labels. We did the same process for "Thin", "Straight", "Curved" (and pointed out that many letters have curved line- a, c, j the students answered), and "Wavy" (I had the kids do a "Wave" like in a baseball stadium before they drew their line). As kids drew I held up some of their examples and described them "Amadea has a SHORT, THICK, BLUE line", "Emily has a LONG, THIN, RED line"
We watched the "Shape" clip and learned the difference between geometric and organic shapes. I asked the students what geometric shapes they knew (circles, squares, rectangles, triangles, octagons they answered). I said geometric shapes usually  had straight lines and edges, except for the circle. I asked the students to draw some geometric shapes on their pages, and if they only drew a circle to include some straight edge shapes too. We looked at the organic shapes and said organic means natural or from nature, like clouds, leaves, trees, animals, or our bodies, and that organic shapes often have curved and wavy lines, not all sharp and straight lines.
At the end I asked the students to return the colored pencils and stack up their sketchbooks. Lunchtime preparation business took over and I said goodbye as the kids left.

I'm pleased with the attention of the group and with how easily Cindy and I fall into a rhythm with each other. I need to ignore the "12:00" as the endtime and think more "11:50" as the end of class. I had hoped to get through a few more clips, but Line and shape were my big ones to accomplish today. The pre-test was too difficult and took longer than expected. There's a big difference between 3rd graders in September and third graders in May!